Dell Integrated System for Microsoft Azure Stack Hub
This hybrid cloud platform delivers infrastructure and platform as a service (IaaS and PaaS) with a consistent Azure experience on-premises and in the public cloud.
Access, create, and share application services securely across Azure and Azure Stack for both traditional and cloud-native applications.
Get hyper-converged infrastructure, networking, backup, and encryption from Dell Technologies, with application development tools from Microsoft.
It delivers enterprise-grade performance and resiliency, including integrated deployment services from Dell Technologies experts.
One-contact support reduces your operational risk, while flexible consumption models make it easy to use.
Dell AX System for Azure Local
A purpose-built system designed to simplify and streamline Azure multi-cloud ecosystem with integrated fully engineered infrastructure foundation.
Designed with full-stack lifecycle management and native Azure integration, the integrated system delivers efficient operations, flexible consumption models and high-level enterprise expertise.
1 - Azure Stack Hub
Dell Integrated System for Microsoft Azure Stack Hub
Run your own private, autonomous cloud — connected or disconnected with cloud-native apps using consistent Azure services on-premises.
Run connected or disconnected from the public cloud
Comply with data sovereignty laws and regulations
Run Azure-consistent Infrastructure-as-a-Service (IaaS) and Platform-as-a-Service (PaaS)
Build cloud-native modern apps
1.1 - Release Artifacts
1.1.1 - Release Artifacts for 2504
1.1.1.1 - Release Artifacts for 14G - 2504
Dell Customer Tools
Component
File Name
Supported Version
Dell Customer Toolkit
AzS_DellEMC_CustomerToolkit_2504.7.zip
2504.7
Dell OEM extension package for drivers and firmware updates
Dell Integrated System for Microsoft Azure Stack Hub Release Notes
Current Release Version: Dell 2504 and Microsoft 2501
Release Type: Major (MA)
NOTE
Dell Azure Stack Hub OEM updates must be installed in sequential order, it is not supported to skip or miss-out an OEM update version. These release notes contain supplemental information for the Dell 2504 release and the Microsoft 2501 release.
This release notes document describes known issues and limitations for the Dell Integrated System for Microsoft Azure Stack Hub solution based on the Dell 2504 release and Microsoft 2501 release.
Item
Description
OEM update
Dell Technologies recommends updating to the n-1 version before applying the latest OEM package.
Microsoft Azure Stack Hub code
For information about known issues and limitations in the Microsoft Azure Stack Hub code, see the Azure Stack Hub 2501 update on the Microsoft website
Notes and warnings
CAUTION
Before you use the Microsoft Patch and Update process to update Azure Stack Hub, close any active session to the ERCS virtual machines. If an active session is open, the update may fail, and must be resumed.
Microsoft fixed issues
For information about fixed issues in this release, see the Azure Stack Hub 2501 update on the Microsoft website.
Dell Integrated System for Microsoft Azure Stack Hub Release Notes
Current Release Version: Dell 2502 and Microsoft 2501
Release Type: Major (MA)
NOTE
Dell Azure Stack Hub OEM updates must be installed in sequential order, it is not supported to skip or miss-out an OEM update version. These release notes contain supplemental information for the Dell 2502 release and the Microsoft 2501 release.
This release notes document describes known issues and limitations for the Dell Integrated System for Microsoft Azure Stack Hub solution based on the Dell 2502 release and Microsoft 2501 release.
Item
Description
OEM update
Dell Technologies recommends updating to the n-1 version before applying the latest OEM package.
Microsoft Azure Stack Hub code
For information about known issues and limitations in the Microsoft Azure Stack Hub code, see the Azure Stack Hub 2501 update on the Microsoft website
Notes and warnings
CAUTION
Before you use the Microsoft Patch and Update process to update Azure Stack Hub, close any active session to the ERCS virtual machines. If an active session is open, the update may fail, and must be resumed.
Microsoft fixed issues
For information about fixed issues in this release, see the Azure Stack Hub 2501 update on the Microsoft website.
Dell Integrated System for Microsoft Azure Stack Hub Release Notes
Current Release Version: Dell 2502 and Microsoft 2501
Release Type: Major (MA)
NOTE
Dell Azure Stack Hub OEM updates must be installed in sequential order, it is not supported to skip or miss-out an OEM update version. These release notes contain supplemental information for the Dell 2502 release and the Microsoft 2501 release.
New features, changed features, and fixes
New features
Initial release of the Dell Integrated System for Microsoft Azure Stack Hub Lifecycle Manager which provides an automated way of upgrading Hardware Lifecycle Host (HLH) firmware, software and driver components. See Patch and Update for 16G.
This release notes document describes known issues and limitations for the Dell Integrated System for Microsoft Azure Stack Hub solution based on the Dell 2502 release and Microsoft 2501 release.
Item
Description
OEM update
Dell Technologies recommends updating to the n-1 version before applying the latest OEM package.
Microsoft Azure Stack Hub code
For information about known issues and limitations in the Microsoft Azure Stack Hub code, see the Azure Stack Hub 2501 update on the Microsoft website
Notes and warnings
CAUTION
Before you use the Microsoft Patch and Update process to update Azure Stack Hub, close any active session to the ERCS virtual machines. If an active session is open, the update may fail, and must be resumed.
Microsoft fixed issues
For information about fixed issues in this release, see the Azure Stack Hub 2501 update on the Microsoft website.
Dell Integrated System for Microsoft Azure Stack Hub Release Notes
Current Release Version: Dell 2411 and Microsoft 2408
Release Type: Major (MA)
NOTE
Dell Azure Stack Hub OEM updates must be installed in sequential order, it is not supported to skip or miss-out an OEM update version. These release notes contain supplemental information for the Dell 2411 release and the Microsoft 2408 release.
This release notes document describes known issues and limitations for the Dell Integrated System for Microsoft Azure Stack Hub solution based on the Dell 2411 release and Microsoft 2408 release.
Item
Description
OEM update
Dell Technologies recommends updating to the n-1 version before applying the latest OEM package.
Microsoft Azure Stack Hub code
For information about known issues and limitations in the Microsoft Azure Stack Hub code, see the Azure Stack Hub 2408 update on the Microsoft website
Notes and warnings
CAUTION
Before you use the Microsoft Patch and Update process to update Azure Stack Hub, close any active session to the ERCS virtual machines. If an active session is open, the update may fail, and must be resumed.
Microsoft fixed issues
For information about fixed issues in this release, see the Azure Stack Hub 2408 update on the Microsoft website.
Dell Integrated System for Microsoft Azure Stack Hub - Valid from Dell 2504 release and Microsoft 2501 release
Abstract
This support matrix provides information about supported software and hardware configurations for Dell Integrated System for Microsoft Azure Stack Hub.
Introduction
The Dell Integrated System for Microsoft Azure Stack Hub Support Matrix describes supported drivers, firmware, applications, and hardware for Dell Integrated System for Microsoft Azure Stack Hub.
NOTE
All references to release dates refer to Dell Technologies releases, unless otherwise indicated.
Dell Integrated System for Microsoft Azure Stack Hub OEM extension package with drivers and firmware updates
AzSHub_16G_Dell2504.2_OEMPackage.zip
2504.2
Dell Integrated System for Microsoft Azure Stack Hub HLH ISO
MS2406_Dell2504.6.iso
2504.6
Dell Integrated System for Microsoft Azure Stack Hub Lifecycle Manager
AzSHub_Dell2504.2_LifecycleManager.zip
2504.2
1.3.2 - Support Matrix for 2502
1.3.2.1 - Support Matrix for 14G - 2502
Dell Integrated System for Microsoft Azure Stack Hub - Valid from Dell 2502 release and Microsoft 2501 release
Abstract
This support matrix provides information about supported software and hardware configurations for Dell Integrated System for Microsoft Azure Stack Hub.
Introduction
The Dell Integrated System for Microsoft Azure Stack Hub Support Matrix describes supported drivers, firmware, applications, and hardware for Dell Integrated System for Microsoft Azure Stack Hub.
NOTE
All references to release dates refer to Dell Technologies releases, unless otherwise indicated.
Dell Integrated Systems for Microsoft Azure Stack Hub OEM extension package with drivers and firmware updates
AzSHub_16G_Dell2502.3_OEMPackage.zip
2502.3
Dell Integrated Systems for Microsoft Azure Stack Hub HLH ISO
MS2406_Dell2502.5.iso
2502.5
Dell Integrated Systems for Microsoft Azure Stack Hub Lifecycle Manager
AzSHub_Dell2502.32_LifecycleManager.zip
2502.32
1.3.3 - Support Matrix for 2411
1.3.3.1 - Support Matrix for 14G - 2411
Dell Integrated System for Microsoft Azure Stack Hub - Valid from Dell 2411 release and Microsoft 2408 release
Abstract
This support matrix provides information about supported software and hardware configurations for Dell Integrated System for Microsoft Azure Stack Hub.
Introduction
The Dell Integrated System for Microsoft Azure Stack Hub Support Matrix describes supported drivers, firmware, applications, and hardware for Dell Integrated System for Microsoft Azure Stack Hub.
NOTE
All references to release dates refer to Dell Technologies releases, unless otherwise indicated.
Dell Integrated Systems for Microsoft Azure Stack Hub OEM extension package with drivers and firmware updates
AzSHub_16G_Dell2411.6_OEMPackage.zip
2411.6
Dell Integrated Systems for Microsoft Azure Stack Hub HLH ISO
MS2406_Dell2411.10.iso
2411.10
1.4 - Patch and Update
1.4.1 - Patch and Update for 16G
Introduction
Microsoft Azure Stack Hub operators are faced with the enormous challenge of keeping their solution both secure and functional. They must ensure that the solution is not vulnerable to threats, external or internal, while maintaining negotiated service-level agreements.
Solution overview
As a Microsoft Azure Stack Hub systems provider, Dell Technologies is committed to ensuring that your Azure Stack Hub environment is both secure and functional. In Dell Technologies releases, you will find firmware and driver updates for both the Hardware Lifecycle Host (HLH) and the scale unit (SU) nodes that are contained in the OEM package updates. Dell Technologies delivers these updates quarterly, and you can apply them independently of Microsoft updates.
There are two other types of update packages for the Azure Stack Hub integrated systems: software updates and hotfixes.
This patch and update guide is for Azure Stack Hub 16th-generation (16G) operators who intend to perform lifecycle operations (Patch and Update) for:
Firmware updates for the Hardware Lifecycle Host (HLH)
Operating System updates for the HLH (Windows Server 2022)
Driver updates for the HLH (Windows Server 2022)
Windows Defender Application Control (WDAC) policy updates for the HLH Operating System
Firmware updates for the Top-of-Rack (ToR) switches (S5248F-ON)
Firmware updates for the scale unit (SU) nodes
Driver updates for the scale unit nodes (Windows Server 2022)
Dell Integrated System for Microsoft Azure Stack Hub Lifecycle Manager overview
Dell Integrated System for Microsoft Azure Stack Hub Lifecycle Manager provides an automated way of upgrading HLH firmware, software, and driver components.
Lifecycle Manager will perform the following tasks:
Update firmware on the Hardware Lifecycle Host
Update drivers on the Hardware Lifecycle Host
Install Windows updates for the Hardware Lifecycle Host Operating System
Update the Windows Defender Application Control (WDAC) policy on the Hardware Lifecycle Host
NOTE
Firmware updates for the Top-of-Rack (ToR) switches are not included in the Lifecycle Manager update process and must be updated manually from the Hardware Lifecycle Host (HLH) using SCP and SSH commands. See the section Manually Updating the Switch Firmware from the Hardware Lifecycle Host (HLH) for more information.
Firmware and driver updates for scale unit (SU) nodes are not included in the Lifecycle Manager update process and must be updated manually using the Azure Stack Hub administrator portal. See the section OEM package updates for more information.
Lifecycle Manager should take between 1-2 hours to complete.
The Azure Stack Hub OEM package update contains firmware, device drivers, and hardware management tools in a specialized format used by Azure Stack Hub during initial deployment and update.
Dell Technologies is responsible for the end-to-end servicing lifecycle for the hardware-related firmware and driver update packages.
In addition, Dell Technologies will own and maintain guidance for all software and hardware on the HLH.
Perform the following steps before proceeding with the Lifecycle Manager update process. There are some steps which are a one-time-activity and some that you must perform in every release.
Download the Lifecycle Manager zip file
To download the latest Lifecycle Manager zip file, perform the following steps:
Log in to the HLH with the HLHAdmin default administrator account or a customer specified administrative user account.
The HLH can be accessed via Remote Desktop Protocol (RDP) from a Permitted Network or directly via the iDRAC Direct port (USB to Micro-USB) connection.
The Lifecycle Manager zip file version must match the version of the OEM package zip file, otherwise the Lifecycle Manager will not pass the pre-checks.
For example, if the Lifecycle Manager zip file is 2502, then the OEM package zip file must also be 2502.
Log in to the HLH with the HLHAdmin default administrator account or a customer specified administrative user account.
The HLH can be accessed via Remote Desktop Protocol (RDP) from a Permitted Network or directly via the iDRAC Direct port (USB to Micro-USB) connection.
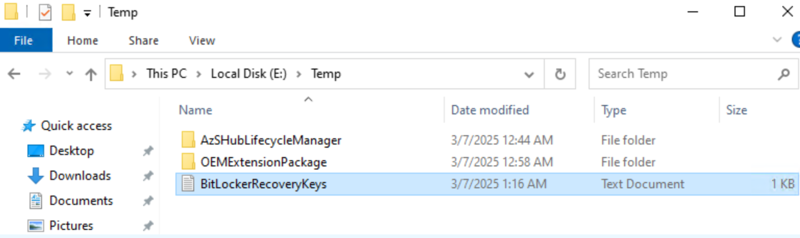
Download the OEM package update zip file to the HLH E:\Temp directory.
Extract Lifecycle Manager and OEM package update zip files
Lifecycle Manager zip and OEM package update zip files that were downloaded to the HLH from the Dell support website will need to be extracted into their own directories.
To extract Lifecycle Manager and OEM package update zip files, perform the following steps:
Steps
Before beginning the extraction process, first the files in the E:\Temp directory will need to be unblocked. Open a PowerShell terminal as administrator and type the following command:
Lifecycle Manager zip file contents must be unblocked; otherwise, the Lifecycle Manager will not pass the pre-checks.
Once the contents within the E:\Temp directory have been unblocked, you can begin to extract the zip files into their directories.
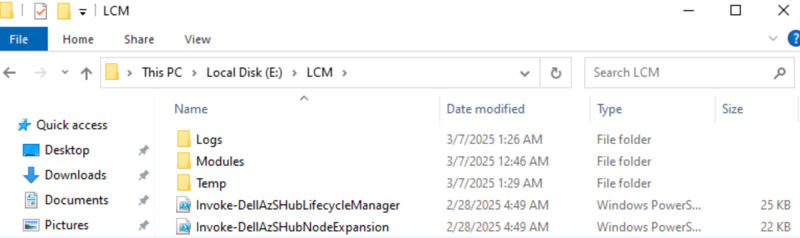
On the HLH, navigate to the E:\ drive and create a folder named LCM.
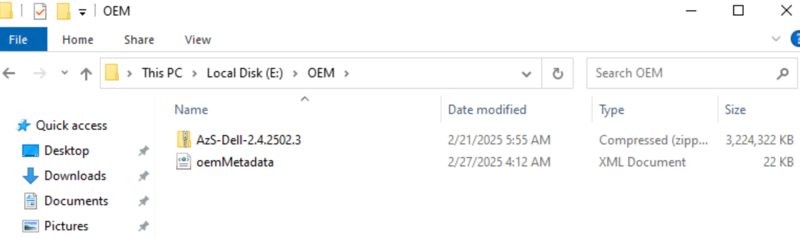
On the HLH, navigate to the E:\ drive and create a folder named OEM.
Extract the Lifecycle Manager zip file from the E:\Temp directory to the E:\LCM directory.
Extract the OEM package update zip file from the E:\Temp directory to the E:\OEM directory.
Hardware Lifecycle Host (HLH)
Running Lifecycle Manager
NOTE
Lifecycle Manager will reboot the HLH multiple times during the upgrade process. You will need to log back into the HLH manually after each reboot; otherwise, the upgrade will not continue until you do.
As an optional step you can enable the Auto Logon feature on the HLH. This will allow the HLH to automatically log back in after each reboot.
To run Lifecycle Manager on the HLH, perform the following steps:
Steps
WARNING
Never use PowerShell ISE at any time during the use of this document.
From the HLH, open a PowerShell console window as an administrator.
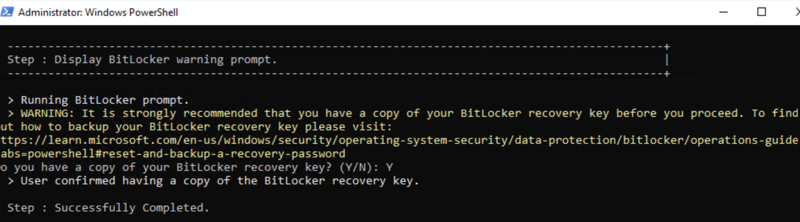
You will need to export the BitLocker recovery keys before proceeding with the upgrade. Type the command below into your PowerShell prompt to export your BitLocker recovery keys.
You will be prompted to provide credentials for the following endpoints:
Hardware Lifecycle Host OS administrative account credential
iDRAC administrative account credential for the Hardware Lifecycle Host
You will then be prompted to confirm that you have backed up the BitLocker recovery keys. Press Y to confirm if you have backed up the BitLocker recovery keys; otherwise, press N to cancel the update process and back up your BitLocker recovery keys.
Once the update process begins, continue to monitor Lifecycle Manager while it runs. While the automation is running there will be multiple reboots, in order to keep the upgrade process progressing you must log back into the HLH manually; otherwise, the upgrade will not continue until you do.
Some updates are grouped together to limit the amount of reboots. The HLH may reboot for any of the following reasons:
Update Type
Reboot Type
Firmware updates
Separate reboot
Driver updates
Grouped reboot
Operating System updates
Grouped reboot
Windows Defender Application Control (WDAC) policy updates
Grouped reboot
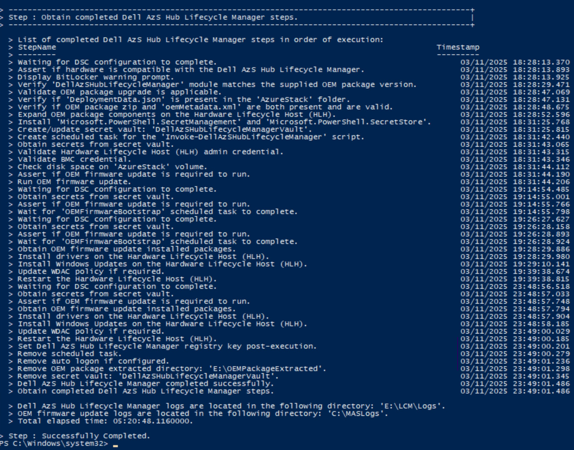
Upon completion, the output should look similar to the image shown below. This shows a list of all completed tasks from Lifecycle Manager, as well as the total elapsed time of the upgrade.
If the upgrade was successful, you will see the Dell AzS Hub Lifecycle Manager completed successfully message in the output.
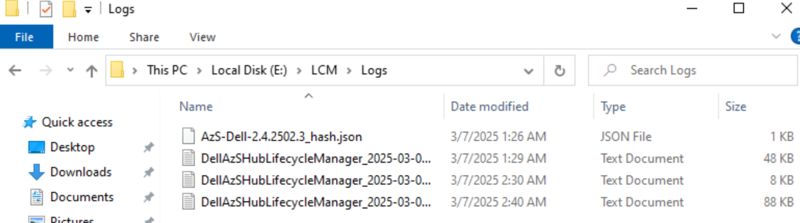
Finally, you can gather logs by navigating to the directory E:\LCM\Logs on the HLH. These logs can be used for troubleshooting purposes if needed.
Additionally, C:\MASLogs will contain logs related to the firmware update process.
Top-of-Rack (ToR) Switches
Manually Updating the Switch Firmware from the Hardware Lifecycle Host (HLH)
You must manually install the OS10 software image from the HLH using SCP and SSH commands.
WARNING
To maintain the integrity of Dell Azure Stack Hub Integrated System, it is required to perform the switch firmware update in conjunction with the Lifecycle Manager update process.
To update switch firmware, perform the following steps:
Steps
WARNING
Never use PowerShell ISE at any time during the use of this document.
From the HLH, open a PowerShell console window as an administrator.
The HLH can be accessed via Remote Desktop Protocol (RDP) from a Permitted Network.
Change directory to E:\OEM\AzS-Dell-<version>\Firmware\Switches\msftdell
Run the following command to copy the switch firmware from the extracted OEM package update zip file on the HLH to the ToR switches.
For example, if upgrading the firmware on ToR-1 with an IP address of 10.128.164.98 and a switch administrative user account of azsadmin-gtbzp, you would run the following:
For example, if upgrading the firmware on ToR-2 with an IP address of 10.128.164.99 and a switch administrative user account of azsadmin-gtbzp, you would run the following:
The below steps will be repeated on each ToR switch (e.g. ToR-1 and ToR-2) ONLY after fully completing the first switch (e.g. ToR-1).
Run the following commands to connect to the ToR switch.
For example, if upgrading the firmware on ToR-1 with an IP address of 10.128.164.98 and a switch administrative user account of azsadmin-gtbzp, you would run the following:
Enter the password of the switch administrative user account when prompted.
Run the following command to move the SCP copied firmware file to its intended destination (/var/os10-image):
system "sudo mv ./PKGS_OS10-Enterprise-<version>-installer-x86_64.bin /var/os10-image"
Enter the password of the switch administrative user account when prompted.
Verify the image is now located in the image directory.
dir image
The output should look similar to the below example:
Directory contents for folder:
Date (modified)        Size (bytes)  Name
---------------------  ------------  ------------------------------------------
2025-03-18T18:37:56+00:667040481     PKGS_OS10-Enterprise-<version>-installer-x86_64.bin
To verify that an installation is not already in progress, run the following command:
show image status
The output should look similar to the below example:
Image Upgrade State:     idle
==================================================
File Transfer State:     idle
--------------------------------------------------
  State Detail:          No download information available
  Task Start:            -001-11-30T00:00:00+00:00
  Task End:              -001-11-30T00:00:00+00:00
  Transfer Progress:     0 %
  Transfer Bytes:        0 bytes
  File Size:             0 bytes
  Transfer Rate:         0 kbps

Installation State:      idle
--------------------------------------------------
  State Detail:          No install information available
  Task Start:            -001-11-30T00:00:00+00:00
  Task End:              -001-11-30T00:00:00+00:00
Run the following command to install the downloaded image to the standby partition:
To view the image install progress, run the following command:
show image status
The output should look similar to the below example:
Image Upgrade State:     idle
==================================================
File Transfer State:     idle
--------------------------------------------------
  State Detail:          No download information available
  Task Start:            0000-00-00T00:00:00Z
  Task End:              0000-00-00T00:00:00Z
  Transfer Progress:     0 %
  Transfer Bytes:        0 bytes
  File Size:             0 bytes
  Transfer Rate:         0 kbps

Installation State:      install
--------------------------------------------------
  State Detail:          In progress: Configure filesystem (3 of 9)
  Task Start:            2025-03-17T21:15:16Z
  Task End:              0000-00-00T00:00:00Z
Keep checking until the image installation is complete. Then check to verify if the image is installed to the standby partition by running the following command:
show boot
The output should look similar to the below example:
Current system image information:
===================================
Type      Boot Type      Active                   Standby                 Next-Boot
-----------------------------------------------------------------------------------
Node-id 1 Flash Boot     [B] 10.5.6.5            [A] 10.6.0.1            [B] active
Set the next boot partition to the standby partition where the downloaded image is installed by running the following command:
boot system standby
Save the currently running configuration and then reload to the configured image by running the following commands:
write memory
reload
After the switch reloads, copy the new active image to the standby boot partition by running the following command:
image copy active-to-standby
Verify the status of the BGP connections on the switches by running the following command:
show ip bgp summary
Verify that BGP is established for all neighbors as indicated by the Up/Down column showing a connection timer. The output should look similar to the below example:
Verify that the switch firmware version was updated by running the following command:
show version
The output should look similar to the below example:
Dell SmartFabric OS10 Enterprise
Copyright (c) 1999-2024 by Dell Inc. All Rights Reserved.
OS Version: 10.6.0.1
Build Version: 10.6.0.1.35
Build Time: 2024-12-02T17:55:39+0000
System Type: S5248F-ON
Architecture: x86_64
Up Time: 1 day 00:11:14
Original Equipment Manufacturer (OEM) package updates
Servicing Policy
Updates for the hardware components in the form of driver updates, firmware updates, and security patches are provided by Dell Technologies. These updates are referred to as OEM package updates. It is recommended to be within N-2 of the current available OEM package for Azure Stack Hub.
WARNING
Azure Stack Hub OEM package updates must be installed in sequential order.
It is not supported to skip an OEM package update version.
Identify the OEM version applied to the Azure Stack Hub
To identify the version of the Original Equipment Manufacturer (OEM) package currently applied to the Azure Stack Hub, perform the following steps:
Steps
Open the Azure Stack Hub administrator portal.
Open the Microsoft Azure Stack Hub - Administration Dashboard and click Dashboard.
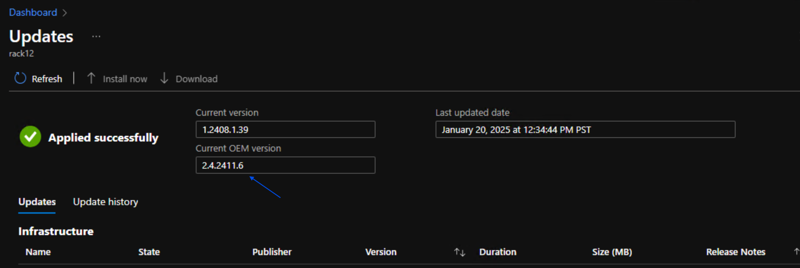
Click Update.
The Updates blade will appear as shown below. The Updates blade displays your current Azure Stack Hub version and the latest deployed version of the OEM package update.
Import and Install an OEM package update
In this step you will be uploading and installing the OEM package update utilizing the Azure Stack Hub administrator portal.
CAUTION
Before you apply an OEM package update, always apply the latest Azure Stack Hub hotfix available for your Azure Stack Hub system.
For additional information about Azure Stack Hub updates, please see:
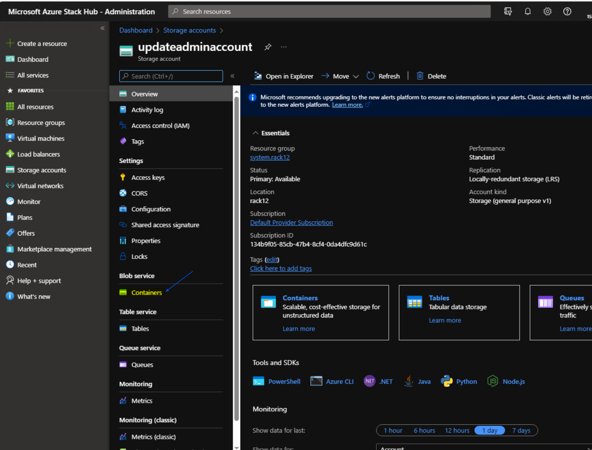
Access the Azure Stack Hub administrator portal of the system you wish to perform the OEM package update on.
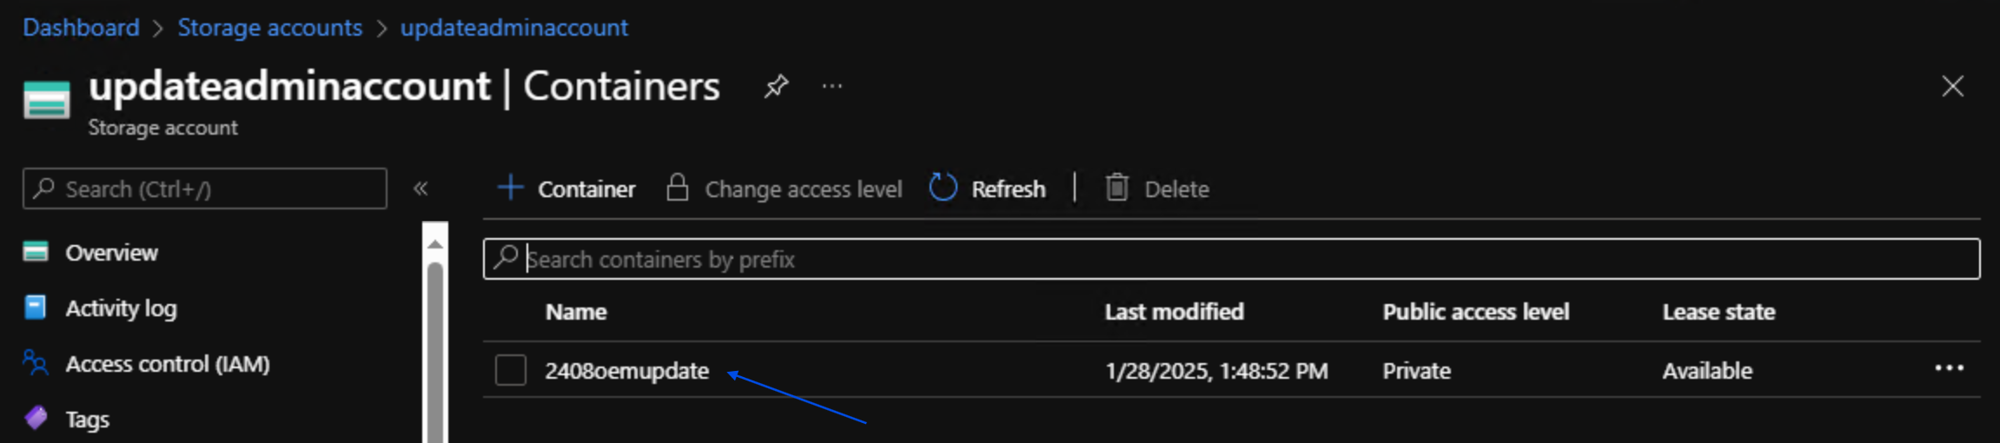
Navigate to Storage accounts > updateadminaccount > Containers.
Create a container for the OEM package update by clicking +Container.
In the Name field on the right navigation pane enter the name for your container e.g. 2408oemupdate and then click Create.
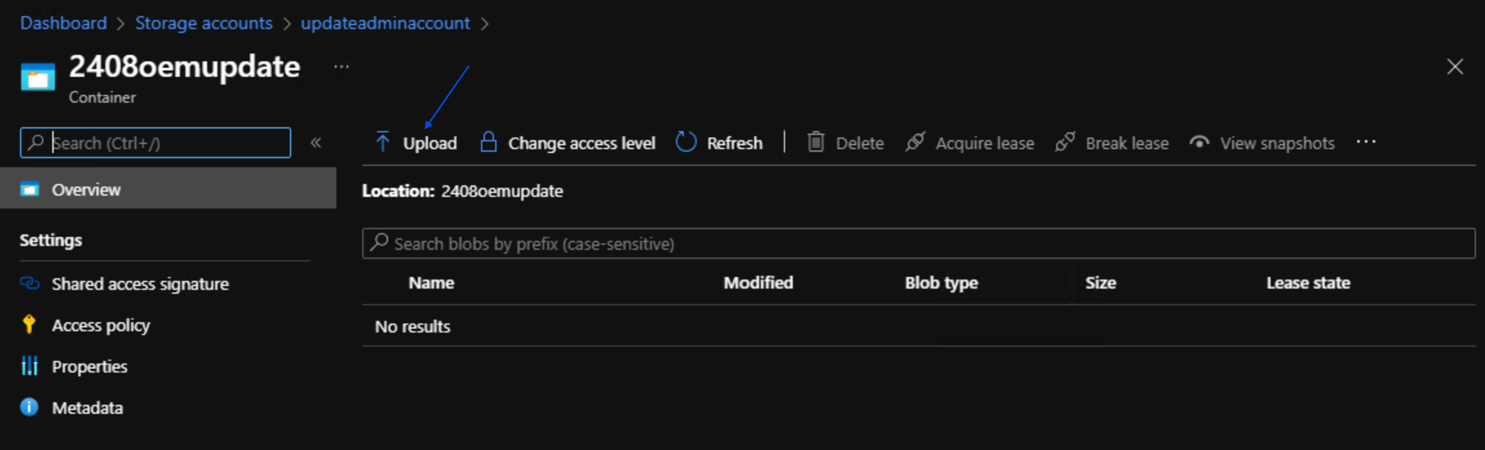
Once the container is created, click the name of the container to access it.
Once you have clicked on the container click Upload at the top of the page.
Dell OEM package updates are in a zip format. The zip file contains the oemMetadata.xml file and the OEM package update payload.
You will need to upload both the zip file for the OEM package update and the oemMetadata.xml that is associated with it.
Once uploaded to the storage account container, they should appear in the container that was created in step 3.
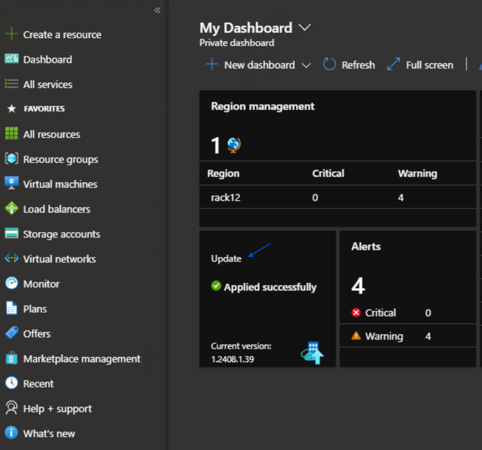
Navigate back to the Dashboard and then click the Update tile.
The Updates blade should now show an available OEM package update that can be installed.
Click the update and then click Install to install the OEM package update.
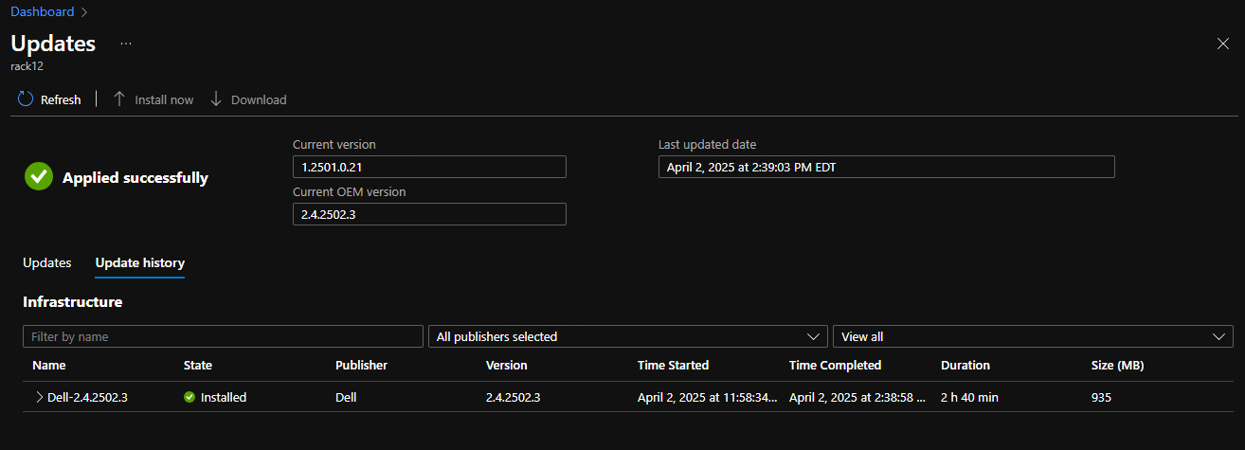
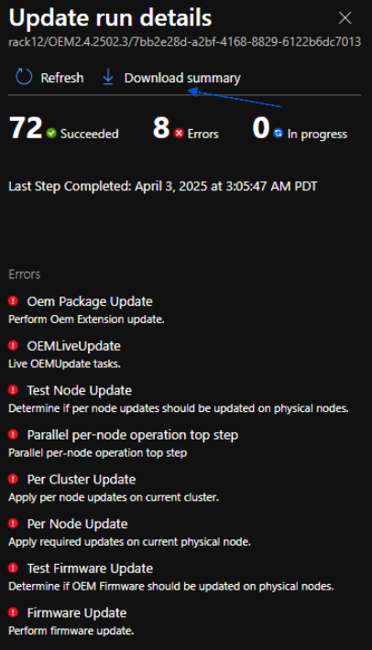
After clicking install on the OEM package update, the update run details can be seen by clicking on the update in the Updates menu once the update has entered into a Preparing or Installing state.
Once completed, Updates blade should display Applied successfully and in the Update history menu the update state should be marked as Installed.
If the update fails, the Update blade reports Needs attention. Click on the failed update and use the Download summary button to get a high-level status of where the update failed.
1.5 - How To
1.5.1 - How to create a service principal name for Azure Stack Hub integrated with Active Directory Federation Services identity using PowerShell
Overview
This article explains how to create a service principal name (SPN) to manage Azure Stack Hub integrated with Active Directory Federation Services (AD FS) identity using PowerShell.
Overview of the creation process for Azure Stack Hub SPN
NOTE
The procedure provided is designed for Azure Stack Hub Operators as it requires Privileged Endpoint (PEP) access as well as assumes the Default Provider Subscription and the Administrator Azure Resource Manager endpoint as the defaults; however, the same mechanism can be applied to the User Subscriptions with minimal changes to the code.
If you want to assign a role the SPN for a User Subscription, replace the Administrator Azure Resource Manager endpoint with the Tenant Azure Resource Manager endpoint and the Default Provider Subscription with Subscription Name you want to modify.
Declare your variables accordingly.
Log in to your Azure Stack Hub Default Provider Subscription with administrator user credentials (needs to have the Owner role).
CAUTION
This requires interactive prompt as by default when using AD FS as your identity provider you cannot use user credentials in the non-interactive way.
This is the main reason why you would want to create an SPN so that you can automate your operations.
Create your AD FS application/service principal.
Assign the appropriate Role to your service principal.
NOTE
As a bonus, we include an example of how to assign the Owner role to an AD FS group
The current AzureStack modules do not support it natively, but this example will show you how to do it via API.
It is the preferred method of assigning roles, you should assign roles to a group rather than individual users.
Log in to your Azure Stack Hub Default Provider Subscription using the SPN account.
Verify SPN authentication and the role assignment.
Create Azure Stack Hub SPN
Create a PFX Certificate
#region Declare variables

$CertificateName = "ADFSAutomationCert"

$CertStore = "cert:\LocalMachine\My" # This can also be "cert:\CurrentUser\My" but in general service accounts cannot access CurrentUser cert store

$CertSubject = "CN=$CertificateName"

$PfxFilePath = "C:\Temp"

if (-not (Test-Path -Path $PfxFilePath)) {

    New-Item -ItemType Directory -Path $PfxFilePath -Force | Out-Null

}

$PfxFilePathFull = Join-Path -Path $PfxFilePath -ChildPath "$($CertificateName).pfx"

$PfxPassword = '""' | ConvertTo-SecureString -AsPlainText -Force # replace "" with an actual password or leave "" for it to be blank

#endregion

#region Create certificate to pass into new Application

$ExpiryDate = (Get-Date).AddDays(365) # You can change this to whatever fits your security profile better, default is 1 year

$Cert = New-SelfSignedCertificate -CertStoreLocation $CertStore -Subject $CertSubject -KeySpec KeyExchange -NotAfter $ExpiryDate

Write-Verbose -Message "Certificate ""$($Cert.Subject)"" with start date ""$($Cert.NotBefore)"" and end date ""$($Cert.NotAfter)"" created at ""$($PfxFilePathFull)""."

#endregion

#region Get a cert object from a .pfx file - you need it to create the SPN to begin with

$Cert = Get-PfxCertificate -FilePath $PfxFilePathFull -Password $PfxPassword

#endregion

#region Optional steps

#region Export the certificate so that you can import it on other environments

try {

    Export-PfxCertificate -Cert $Cert.PsPath -FilePath $PfxFilePathFull -Password $PfxPassword -ErrorAction Stop | Out-Null

} catch {

    throw "Failed to export certificate to ""$($PfxFilePathFull)"":`n$($_.Exception.Message)"

}

#endregion

#region Import the certificate into the certificate store on another environment

Import-PfxCertificate -CertStoreLocation $CertStore -FilePath $PfxFilePathFull -Password $PfxPassword -Exportable

#endregion

#endregion
Create Azure Stack Hub SPN that uses certificate credential
#region Declare variables

$CertificateName = "ADFSAutomationCert"

$PfxFilePath = "C:\Temp"

$PfxFilePathFull = Join-Path -Path $PfxFilePath -ChildPath "$($CertificateName).pfx"

$PfxPassword = '""' | ConvertTo-SecureString -AsPlainText -Force

$CertificateObject = Get-PfxCertificate -FilePath $PfxFilePathFull -Password $PfxPassword

$CertificateThumbprint = $CertificateObject.Thumbprint

if (!$CertificateThumbprint) {

    throw "Failed to obtain a thumbprint from certificate: $($PfxFilePathFull)"

}

$CloudAdminUsername = "CloudAdmin@azurestack.local"

[SecureString]$CloudAdminPassword = ConvertTo-SecureString "Password123!" -AsPlainText -Force

$ApplicationName = "ADFSAppCert"

$AzureStackRole = "Owner"

$ADGroupName = "AzureStackHubOwners"

$AzureStackAdminArmEndpoint = "https://adminmanagement.local.azurestack.external/"

$EnvironmentName = "AzureStackAdmin"

$PepCreds = New-Object -TypeName System.Management.Automation.PSCredential -ArgumentList $CloudAdminUsername, $CloudAdminPassword

$PepIPAddress = "x.x.x.224" # e.g. 10.5.30.224

#endregion

#region Register and set an Az environment that targets your Azure Stack Hub instance

Write-Output -InputObject "Connecting to Azure Stack Hub Admin Management Endpoint - $(AzureStackAdminArmEndpoint)"

$null = Add-AzEnvironment -Name $EnvironmentName -ARMEndpoint $AzureStackAdminArmEndpoint

$null = Connect-AzAccount -Environment $EnvironmentName -UseDeviceAuthentication # Interactive prompt

if (((Get-AzContext).Subscription).Name -notlike "Default Provider Subscription") {

    throw "Failed to obtain access to the 'Default Provider Subscription'. Please verify the user has been assigned the '$($AzureStackRole)' role for the 'Default Provider Subscription'."

}

#endregion

#region Create a PSSession to the Privileged Endpoint VM

Write-Output -InputObject "Create a PowerShell Session to the Privileged Endpoint VM"

$PepSession = New-PSSession -ComputerName $PepIPAddress -ConfigurationName PrivilegedEndpoint -Credential $PepCreds -SessionOption (New-PSSessionOption -Culture en-US -UICulture en-US)

#endregion

#region Check for existing SPN

Write-Output -InputObject "Check for existing SPN '$($ApplicationName)'"

$SPNObjectCheckJob = Invoke-Command -Session $PepSession -ScriptBlock { Get-GraphApplication } -AsJob | Wait-Job

if ($SPNObjectCheckJob.State -ne "Completed") {

    throw "$($SPNObjectCheckJob.ChildJobs | Receive-Job)"

}

$SPNObjectCheck = $SPNObjectCheckJob.ChildJobs.Output | Where-Object { $_.Name -like "Azurestack-$ApplicationName*" } | Select-Object -Last 1

#endregion

#region Create new SPN if one does not exist

if ($SPNObjectCheck) {

    Write-Output -InputObject "SPN details`n$($ApplicationName): $($SPNObjectCheck | Out-String)"

} else {

    Write-Output -InputObject "No existing SPN found"

    Write-Output -InputObject "Create new SPN '$($ApplicationName)'"

    $SPNObjectJob = Invoke-Command -Session $PepSession -ScriptBlock { New-GraphApplication -Name $using:ApplicationName -ClientCertificates $using:CertificateObject } -AsJob | Wait-Job

    if ($SPNObjectJob.State -ne "Completed") {

        throw "$($SPNObjectJob.ChildJobs | Receive-Job)"

    }

    $SPNObject = $SPNObjectJob.ChildJobs.Output

    Write-Output -InputObject "SPN details`n$($ApplicationName): $($SPNObject | Out-String)"

    $FullApplicationName = $SPNObject.ApplicationName

    #endregion

}

#region Assign SPN the 'Owner' role for the 'Default Provider Subscription'

Write-Output -InputObject "Assign SPN '$($ApplicationName)' the '$($AzureStackRole)' role for the 'Default Provider Subscription'"

if ($FullApplicationName) {

    $SPNADFSApp = Get-AzADServicePrincipal | Where-Object { $_.DisplayName -like "$($FullApplicationName)" }

} else {

    $SPNADFSApp = Get-AzADServicePrincipal | Where-Object { $_.DisplayName -like "*$($ApplicationName)*" } | Select-Object -Last 1

}

$SPNRoleAssignmentCheck = Get-AzRoleAssignment -ObjectId $SPNADFSApp.AdfsId

if (!($SPNRoleAssignmentCheck) -or ($SPNRoleAssignmentCheck.RoleDefinitionName -ne $AzureStackRole)) {

    $null = New-AzRoleAssignment -RoleDefinitionName $AzureStackRole -ServicePrincipalName $SPNADFSApp.ApplicationId.Guid

    #region Verify SPN has been assigned the 'Owner' role for the 'Default Provider Subscription'

    $SPNRoleAssignment = Get-AzRoleAssignment -ObjectId $SPNADFSApp.AdfsId

    if (!($SPNRoleAssignment) -or ($SPNRoleAssignment.RoleDefinitionName -ne $AzureStackRole)) {

        throw "Failed to assign SPN '$($ApplicationName)' the '$($AzureStackRole)' role for the Default Provider Subscription"

    }

    #endregion

}

#endregion

#region Assign AD group 'AzureStackOwners' the 'Owner' role for the 'Default Provider Subscription'

Write-Output -InputObject "Assign AD group '$($ADGroupName)' the '$($AzureStackRole)' role for the 'Default Provider Subscription'"

$ADGroup = Get-AzADGroup -DisplayNameStartsWith $ADGroupName

$SubId = (Get-AzSubscription -SubscriptionName "Default Provider Subscription").Id

$OwnerRoleId = (Get-AzRoleDefinition -Name $AzureStackRole).Id

$APIPayloadHash = @{

    "properties" = @{

        "roleDefinitionId" = "/subscriptions/$($SubId)/providers/Microsoft.Authorization/roleDefinitions/$($OwnerRoleId)"
        "principalId"      = "$($ADGroup.AdfsId)"

    }

} | ConvertTo-Json -Depth 50

$APIPath = "/subscriptions/$($SubId)/providers/Microsoft.Authorization/roleAssignments/$($OwnerRoleId)?api-version=2015-07-01"

$APIResponse = Invoke-AzRestMethod -Path $APIPath -Method "PUT" -Payload $APIPayloadHash

if ($APIResponse.StatusCode -ne "201") {

    throw "Failed to create role assignment for ""$($ADGroup.DisplayName)"" in subscription ""$($SubId)"" with role ""$($AzureStackRole)"" and role ID ""$($OwnerRoleId)"""

}

#endregion

#region Verify AD group 'AzureStackOwners' has been assigned the 'Owner' role for the 'Default Provider Subscription'

$ADGroupRoleAssignment = Get-AzRoleAssignment -ObjectId $ADGroup.AdfsId

if (!($ADGroupRoleAssignment) -or ($ADGroupRoleAssignment.RoleDefinitionName -ne $AzureStackRole)) {

    throw "Failed to assign AD group '$($ADGroupName)' the '$($AzureStackRole)' role for the 'Default Provider Subscription'"

}

#endregion

#region Obtain authentication information

# GUID of the directory tenant
$TenantId = (Get-AzContext).Tenant.Id

Write-Output -InputObject "TenantId: $($TenantId)"
Write-Output -InputObject ""
Write-Output -InputObject "ApplicationName: $($SPNADFSApp.DisplayName)"
Write-Output -InputObject ""
Write-Output -InputObject "ApplicationId: $($SPNADFSApp.ApplicationId.Guid)"
Write-Output -InputObject ""
Write-Output -InputObject "CertificateThumbprint: $($CertificateThumbprint)"
Write-Output -InputObject ""
Write-Output -InputObject "Admin ARM Endpoint: $($AzureStackAdminArmEndpoint)"

#endregion

#region Verify if SPN can authenticate to Azure Stack Hub Admin Management Endpoint

Write-Output -InputObject "Verify if SPN can authenticate to Azure Stack Hub Admin Management Endpoint"

$null = Clear-AzContext -Force

$null = Connect-AzAccount -Environment $EnvironmentName -ServicePrincipal -Tenant $TenantId -ApplicationId $SPNADFSApp.ApplicationId.Guid -CertificateThumbprint $CertificateThumbprint

if (((Get-AzContext).Subscription).Name -notlike "Default Provider Subscription") {

    throw "Failed to obtain access to the 'Default Provider Subscription'. Please verify the SPN has been assigned the '$($AzureStackRole)' role for the 'Default Provider Subscription'."

} else {

    Write-Output -InputObject "Your SPN can successfully authenticate with ARM Endpoint $($AzureStackAdminArmEndpoint) and has got access to the 'Default Provider Subscription'"

}

#endregion

#region Remove sessions

if ($PepSession) {

    Write-Output -InputObject "Removing PSSSession to the Privileged Endpoint"

    Remove-PSSession -Session $PepSession

}

$CheckContext = Get-AzContext | Where-Object { $_.Environment -like $EnvironmentName }

if ($CheckContext) {

    Write-Output -InputObject "Disconnecting from AzS Hub Admin Management Endpoint: $($CheckContext.Environment.ResourceManagerUrl)"

    $null = Disconnect-AzAccount

}

#endregion
CAUTION
Using a client secret is less secure than using an X509 certificate credential. Not only is the authentication mechanism less secure, but it also typically requires embedding the secret in the client app source code. As such, for production apps, you’re strongly encouraged to use a certificate credential.
#region Declare variables

$CloudAdminUsername = "CloudAdmin@azurestack.local"

[SecureString]$CloudAdminPassword = ConvertTo-SecureString "Password123!" -AsPlainText -Force

$ApplicationName = "ADFSAppCert"

$AzureStackRole = "Owner"

$ADGroupName = "AzureStackHubOwners"

$AzureStackAdminArmEndpoint = "https://adminmanagement.local.azurestack.external/"

$EnvironmentName = "AzureStackAdmin"

$PepCreds = New-Object -TypeName System.Management.Automation.PSCredential -ArgumentList $CloudAdminUsername, $CloudAdminPassword

$PepIPAddress = "x.x.x.224" # e.g. 10.5.30.224

#endregion

#region Register and set an Az environment that targets your Azure Stack Hub instance

Write-Output -InputObject "Connecting to Azure Stack Hub Admin Management Endpoint - $(AzureStackAdminArmEndpoint)"

$null = Add-AzEnvironment -Name $EnvironmentName -ARMEndpoint $AzureStackAdminArmEndpoint

$null = Connect-AzAccount -Environment $EnvironmentName -UseDeviceAuthentication # Interactive prompt

if (((Get-AzContext).Subscription).Name -notlike "Default Provider Subscription") {

    throw "Failed to obtain access to the 'Default Provider Subscription'. Please verify the user has been assigned the '$($AzureStackRole)' role for the 'Default Provider Subscription'."

}

#endregion

#region Create a PSSession to the Privileged Endpoint VM

Write-Output -InputObject "Create a PowerShell Session to the Privileged Endpoint VM"

$PepSession = New-PSSession -ComputerName $PepIPAddress -ConfigurationName PrivilegedEndpoint -Credential $PepCreds -SessionOption (New-PSSessionOption -Culture en-US -UICulture en-US)

#endregion

#region Check for existing SPN

Write-Output -InputObject "Check for existing SPN '$($ApplicationName)'"

$SPNObjectCheckJob = Invoke-Command -Session $PepSession -ScriptBlock { Get-GraphApplication } -AsJob | Wait-Job

if ($SPNObjectCheckJob.State -ne "Completed") {

    throw "$($SPNObjectCheckJob.ChildJobs | Receive-Job)"

}

$SPNObjectCheck = $SPNObjectCheckJob.ChildJobs.Output | Where-Object { $_.Name -like "Azurestack-$ApplicationName*" } | Select-Object -Last 1

#endregion

#region Create new SPN if one does not exist

if ($SPNObjectCheck) {

    Write-Output -InputObject "SPN details`n$($ApplicationName): $($SPNObjectCheck | Out-String)"

} else {

    Write-Output -InputObject "No existing SPN found"

    Write-Output -InputObject "Create new SPN '$($ApplicationName)'"

    $SPNObjectJob = Invoke-Command -Session $PepSession -ScriptBlock { New-GraphApplication -Name $using:ApplicationName -GenerateClientSecret } -AsJob | Wait-Job

    if ($SPNObjectJob.State -ne "Completed") {

        throw "$($SPNObjectJob.ChildJobs | Receive-Job)"

    }

    $SPNObject = $SPNObjectJob.ChildJobs.Output

    Write-Output -InputObject "SPN details`n$($ApplicationName): $($SPNObject | Out-String)"

    $FullApplicationName = $SPNObject.ApplicationName

    $SPNClientId = $SPNObject.ClientId

    $SPNClientSecret = $SPNObject.ClientSecret | ConvertTo-SecureString -AsPlainText -Force

    $SPNCreds = New-Object -TypeName System.Management.Automation.PSCredential -ArgumentList $SPNClientId, $SPNClientSecret

    #endregion

}

#region Assign SPN the 'Owner' role for the 'Default Provider Subscription'

Write-Output -InputObject "Assign SPN '$($ApplicationName)' the '$($AzureStackRole)' role for the 'Default Provider Subscription'"

if ($FullApplicationName) {

    $SPNADFSApp = Get-AzADServicePrincipal | Where-Object { $_.DisplayName -like "$($FullApplicationName)" }

} else {

    $SPNADFSApp = Get-AzADServicePrincipal | Where-Object { $_.DisplayName -like "*$($ApplicationName)*" } | Select-Object -Last 1

}

$SPNRoleAssignmentCheck = Get-AzRoleAssignment -ObjectId $SPNADFSApp.AdfsId

if (!($SPNRoleAssignmentCheck) -or ($SPNRoleAssignmentCheck.RoleDefinitionName -ne $AzureStackRole)) {

    $null = New-AzRoleAssignment -RoleDefinitionName $AzureStackRole -ServicePrincipalName $SPNADFSApp.ApplicationId.Guid

    #region Verify SPN has been assigned the 'Owner' role for the 'Default Provider Subscription'

    $SPNRoleAssignment = Get-AzRoleAssignment -ObjectId $SPNADFSApp.AdfsId

    if (!($SPNRoleAssignment) -or ($SPNRoleAssignment.RoleDefinitionName -ne $AzureStackRole)) {

        throw "Failed to assign SPN '$($ApplicationName)' the '$($AzureStackRole)' role for the Default Provider Subscription"

    }

    #endregion

}

#endregion

#region Assign AD group 'AzureStackOwners' the 'Owner' role for the 'Default Provider Subscription'

Write-Output -InputObject "Assign AD group '$($ADGroupName)' the '$($AzureStackRole)' role for the 'Default Provider Subscription'"

$ADGroup = Get-AzADGroup -DisplayNameStartsWith $ADGroupName

$SubId = (Get-AzSubscription -SubscriptionName "Default Provider Subscription").Id

$OwnerRoleId = (Get-AzRoleDefinition -Name $AzureStackRole).Id

$APIPayloadHash = @{

    "properties" = @{

        "roleDefinitionId" = "/subscriptions/$($SubId)/providers/Microsoft.Authorization/roleDefinitions/$($OwnerRoleId)"
        "principalId"      = "$($ADGroup.AdfsId)"

    }

} | ConvertTo-Json -Depth 50

$APIPath = "/subscriptions/$($SubId)/providers/Microsoft.Authorization/roleAssignments/$($OwnerRoleId)?api-version=2015-07-01"

$APIResponse = Invoke-AzRestMethod -Path $APIPath -Method "PUT" -Payload $APIPayloadHash

if ($APIResponse.StatusCode -ne "201") {

    throw "Failed to create role assignment for ""$($ADGroup.DisplayName)"" in subscription ""$($SubId)"" with role ""$($AzureStackRole)"" and role ID ""$($OwnerRoleId)"""

}

#endregion

#region Verify AD group 'AzureStackOwners' has been assigned the 'Owner' role for the 'Default Provider Subscription'

$ADGroupRoleAssignment = Get-AzRoleAssignment -ObjectId $ADGroup.AdfsId

if (!($ADGroupRoleAssignment) -or ($ADGroupRoleAssignment.RoleDefinitionName -ne $AzureStackRole)) {

    throw "Failed to assign AD group '$($ADGroupName)' the '$($AzureStackRole)' role for the 'Default Provider Subscription'"

}

#endregion

#region Obtain authentication information

# GUID of the directory tenant
$TenantId = (Get-AzContext).Tenant.Id

Write-Output -InputObject "TenantId: $($TenantId)"
Write-Output -InputObject ""
Write-Output -InputObject "ApplicationName: $($SPNADFSApp.DisplayName)"
Write-Output -InputObject ""
Write-Output -InputObject "ApplicationId: $($SPNADFSApp.ApplicationId.Guid)"
Write-Output -InputObject ""
Write-Output -InputObject "ClientSecret: $($SPNObject.ClientSecret)"
Write-Output -InputObject ""
Write-Output -InputObject "Admin ARM Endpoint: $($AzureStackAdminArmEndpoint)"

#endregion

#region Verify if SPN can authenticate to Azure Stack Hub Admin Management Endpoint

Write-Output -InputObject "Verify if SPN can authenticate to Azure Stack Hub Admin Management Endpoint"

$null = Clear-AzContext -Force

$null = Connect-AzAccount -Environment $EnvironmentName -ServicePrincipal -Tenant $TenantId -Credential $SPNCreds

if (((Get-AzContext).Subscription).Name -notlike "Default Provider Subscription") {

    throw "Failed to obtain access to the 'Default Provider Subscription'. Please verify the SPN has been assigned the '$($AzureStackRole)' role for the 'Default Provider Subscription'."

} else {

    Write-Output -InputObject "Your SPN can successfully authenticate with ARM Endpoint $($AzureStackAdminArmEndpoint) and has got access to the 'Default Provider Subscription'"

}

#endregion

#region Remove sessions

if ($PepSession) {

    Write-Output -InputObject "Removing PSSSession to the Privileged Endpoint"

    Remove-PSSession -Session $PepSession

}

$CheckContext = Get-AzContext | Where-Object { $_.Environment -like $EnvironmentName }

if ($CheckContext) {

    Write-Output -InputObject "Disconnecting from AzS Hub Admin Management Endpoint: $($CheckContext.Environment.ResourceManagerUrl)"

    $null = Disconnect-AzAccount

}

#endregion
2 - Azure Local
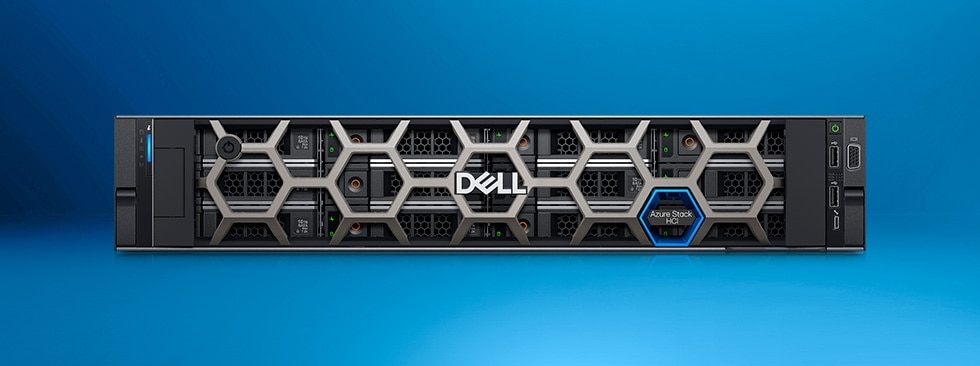
Dell AX System for Azure Local
Delivered as an Azure service, run virtualized applications on-premises with full stack lifecycle management while easily connecting resources to Azure.
Refresh and modernize aging virtualization platforms
Integrate with Azure for hybrid capabilities
Provide compute and storage at remote branch offices
Deploy and manage Azure cloud and Azure Local anywhere with Azure Arc as a single control plane
2.1 - Planning Azure Local
This documentation is written from a Sys-Admin point of view as an addition to the official documentation, with the intent to demonstrate to IT Professionals how it compares to traditional solutions and Windows Server with a focus on Dell portfolio.
2.1.1 - 01. Operating System
Planning Operating System
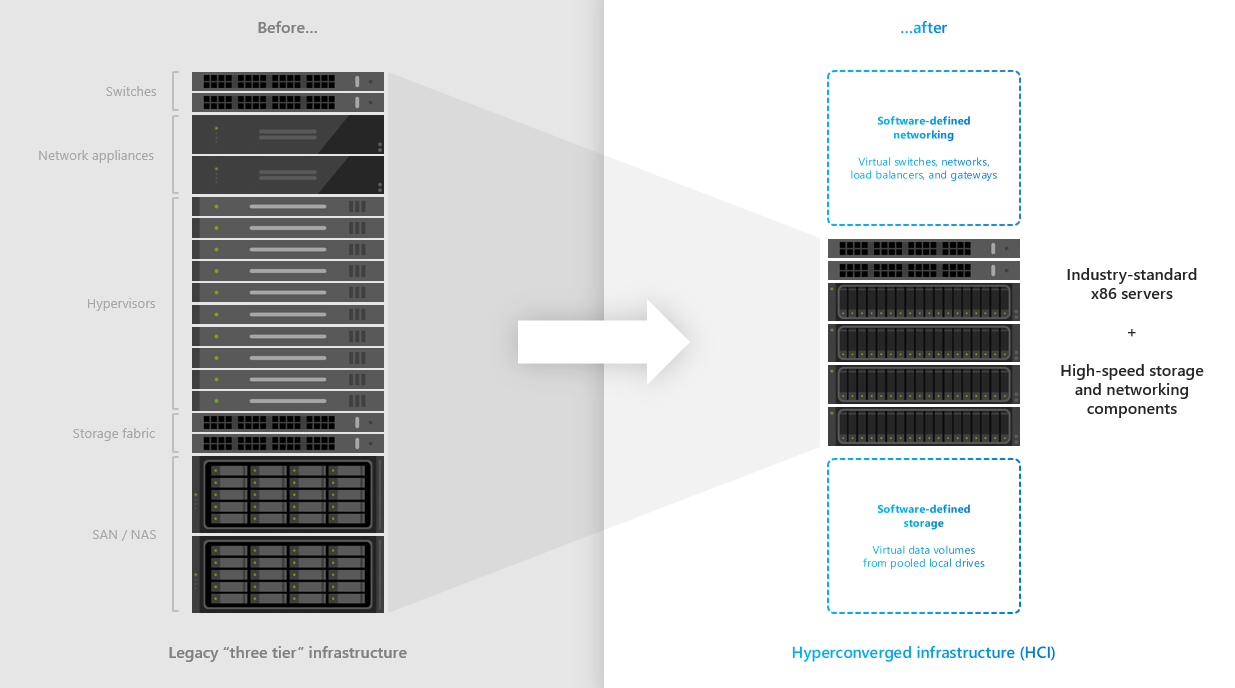
Storage Spaces Direct is technology, that is contained in both Azure Stack HCI OS and Windows Server Datacenter. It enables you to create hyperconverged cluster as there is a software storage bus, that enables every cluster node to access all physical disks in cluster.
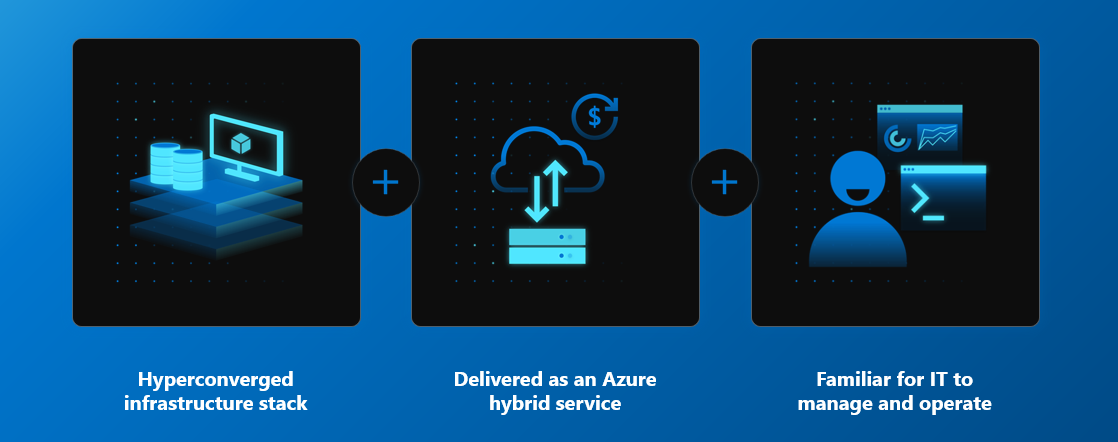
Familiar for IT
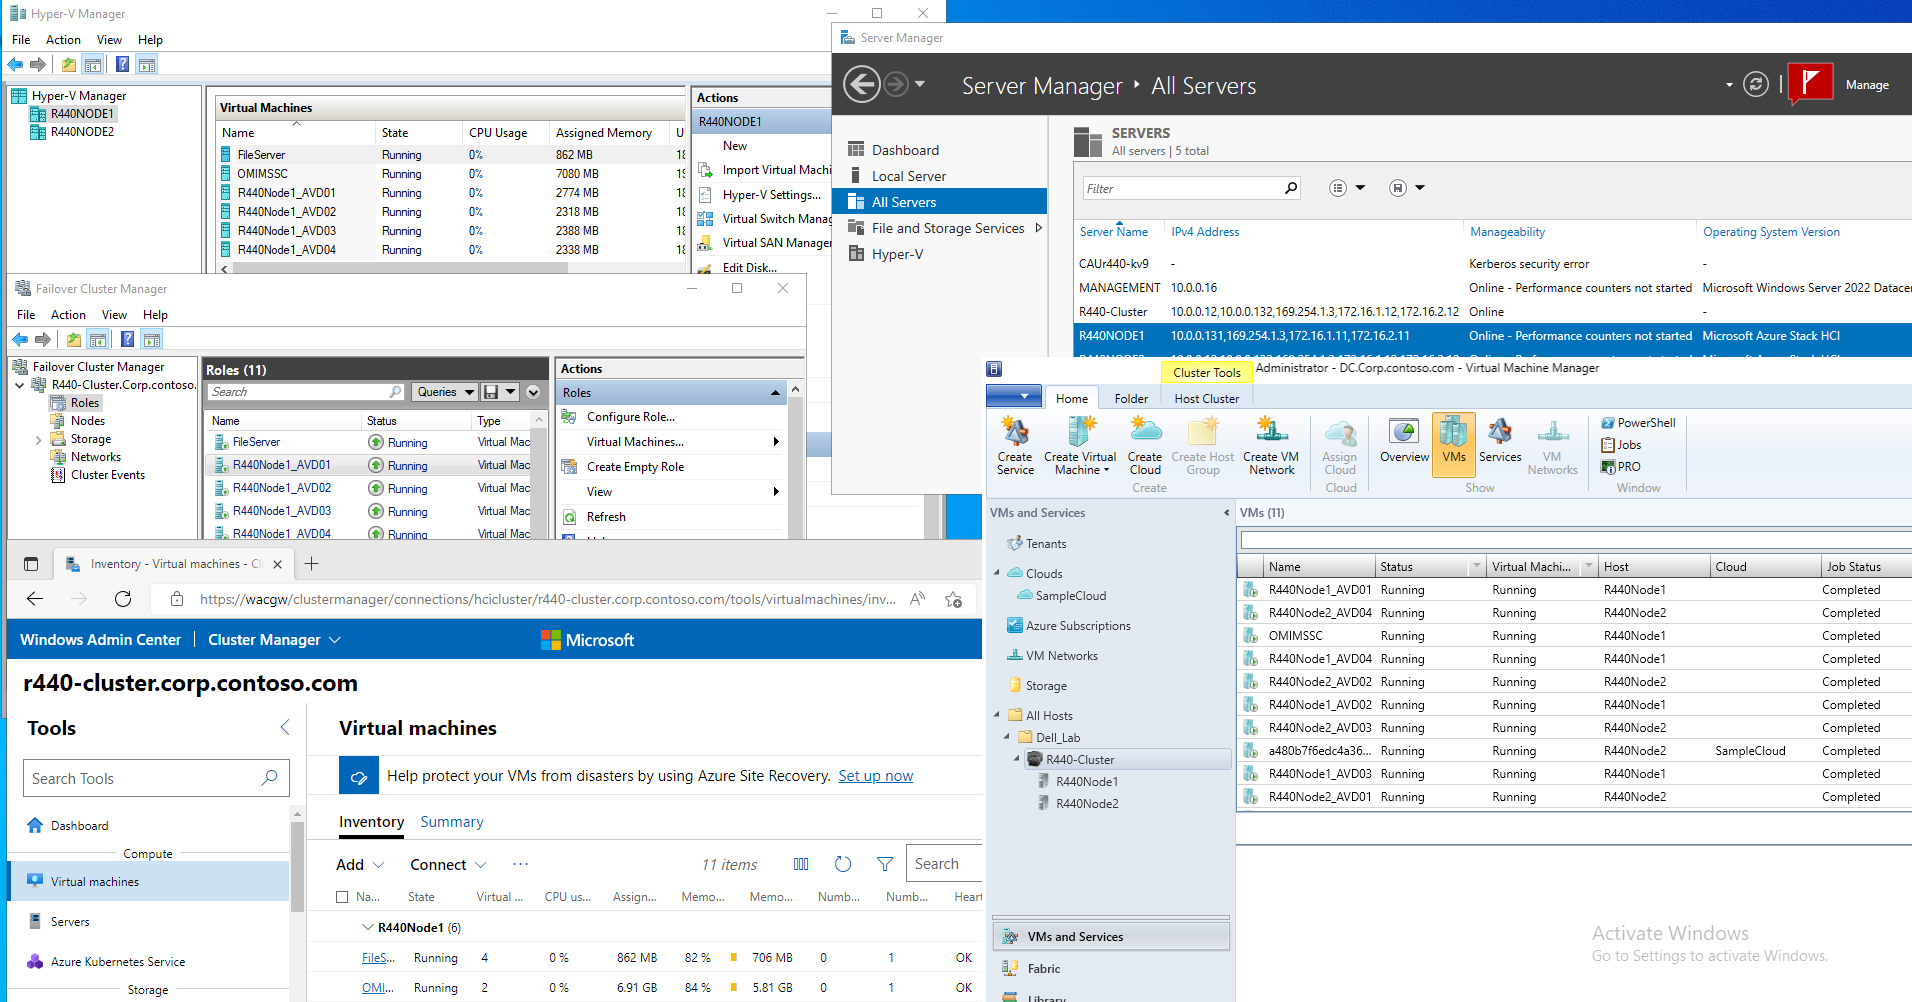
Both operating systems are easy to use for Windows Server admins that are familiar with failover clustering as both systems are using traditional technologies (Failover Clustering, Hyper-V) while domain joined. Therefore all tools (such as Server Manager, MMC and Windows Admin Center) can be used for management.
Hyper-Converged infrastructure stack
Both Azure Stack HCI and Windows Server are using the same technology that is well known since Windows Server 2016 - Storage Spaces Direct. Storage Spaces Direct enables all servers to see all disks from every node, therefore Storage Spaces stack can define resiliency and place data (slabs) in different fault domains. In this case nodes. Since all is happening in software, devices like high-speed NVMe disks can be used and shared using software stack using high-speed RDMA network adapters.
Delivered as an Azure hybrid service
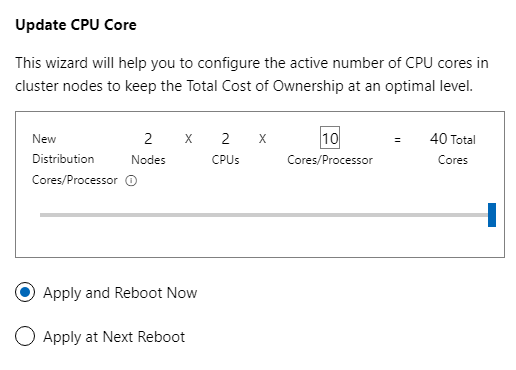
The difference between both products is in way the service is consumed. With Windows Server, it’s traditional “buy and forget” model, where you can have operating system that is supported for 5+5 years (main+extended support) and you can pay upfront (OEM License, EA License …). Azure Stack HCI licensing can be dynamic. Imagine investing into the system where you have 40 cores/node, but you will initially use 16 cores only - you can easily configure number of cores in DELL systems using Openmanage Integration in Windows Admin Center and then pay only for how much you consume.
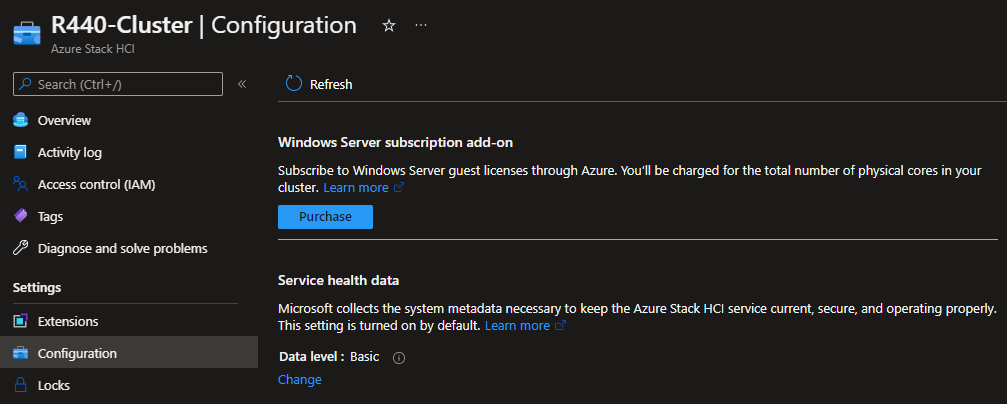
Additionally you can purchase Windows Server licenses as subscription add-on
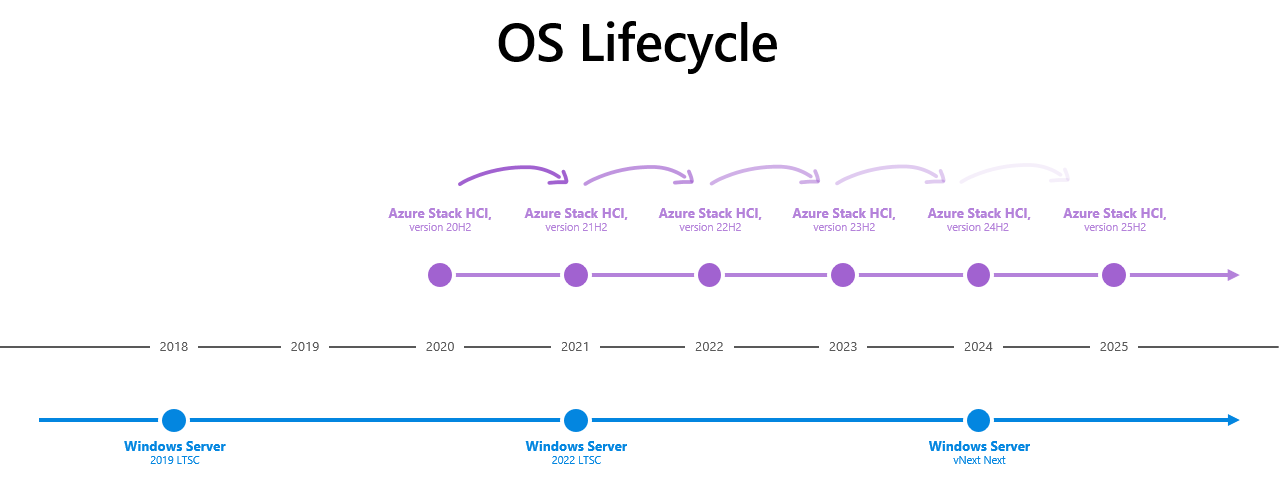
OS Lifecycle
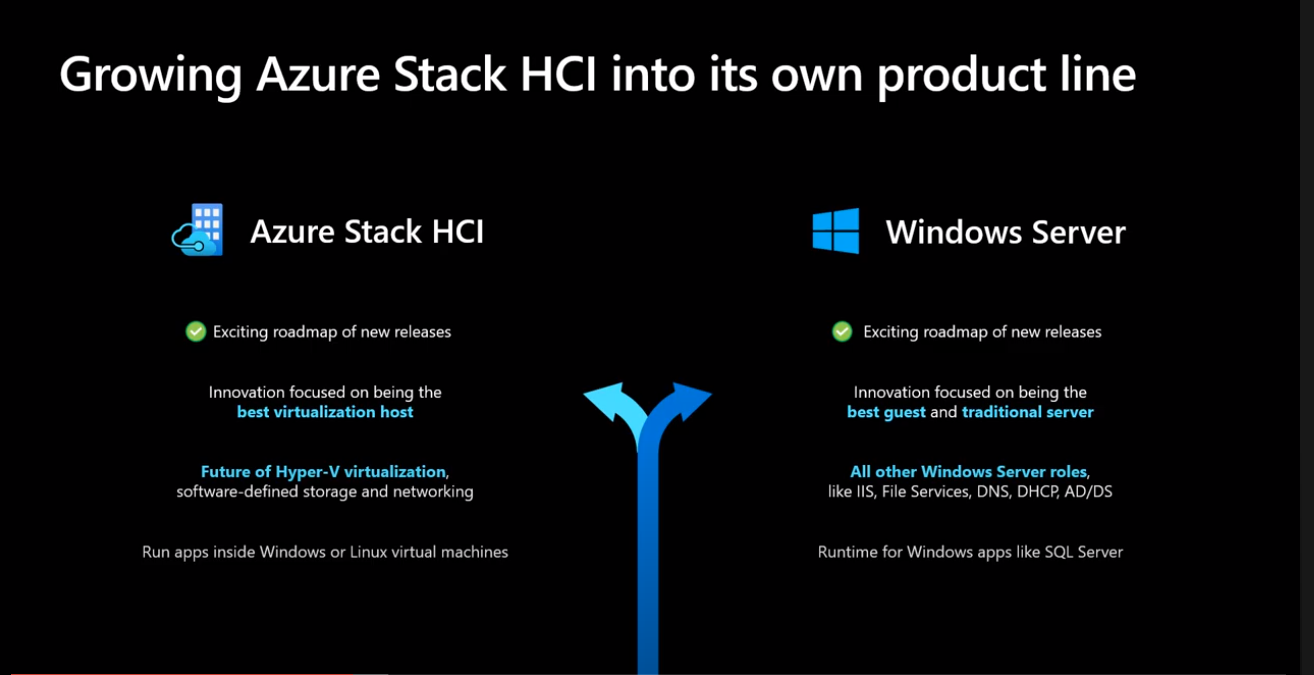
The main difference is the way features are developed for each platform. Windows Server follows traditional development cycle (new version every 2.5-3years), while Azure Stack HCI follows cloud development cycle together with Windows Client OS (new version every year).
As result, new features are developed and delivered into Azure Stack HCI OS every year.
While both Windows Server and Azure Stack HCI operating systems can run on virtualization host, going forward the main focus will be Azure Stack HCI OS for hosts and Windows Server for guest workloads. For more information see the video below.
Comparison of Azure Stack HCI and Windows Server is available in official docs.
2.1.2 - 02. Supporting Infrastructure
Planning Supporting Infrastructure
There are several deployment sizes. Let’s split it into three main categories. While all three categories can be managed just with one management machine and PowerShell, with more clusters or racks, management of the infrastructure can be very complex task. We can assume, that with Azure Stack HCI hybrid capabilities, will more infrastructure move into cloud.
In many cases we hear, that due to security, DHCP is not allowed in server subnet. Limiting what server can receive IP address can be done with MAC Address Filtering.
Management infrastructure can be deployed in separate domain from hosted virtual machines to further increase security.
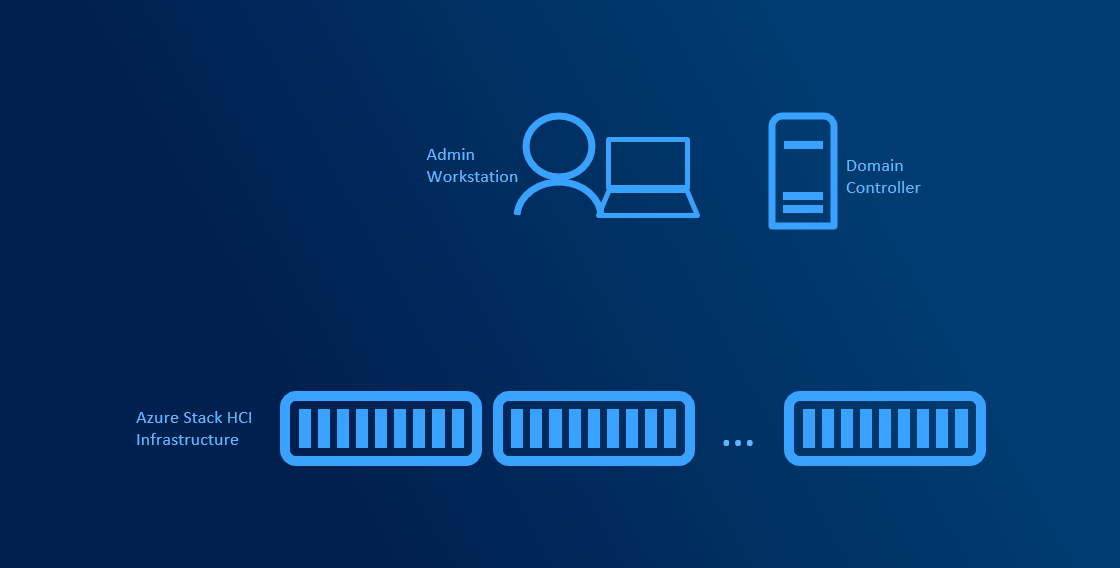
The minimum components are Domain Controller and Management machine. Management machine can be Windows 10 or Windows Server at least the same version as the managed server (for example Windows 10 1809 and newer can manage Windows Server 2019). DHCP server can significantly help as managed servers can receive IP address. That means you can manage them remotely without logging into servers to configure static IP, but it’s not mandatory.
Windows Admin Center can be installed on Admin Workstation. From there, infrastructure can be managed using Windows Admin Center, PowerShell or legacy remote management tools (such as mmc).
Medium infrastructure
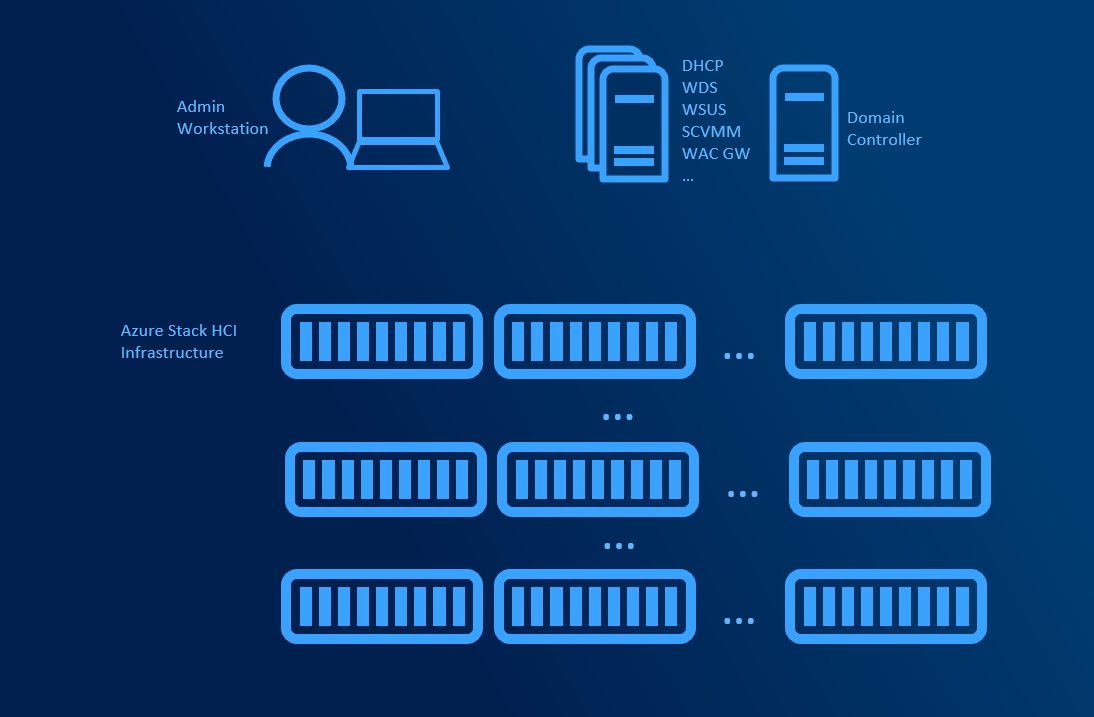
Medium infrastructure assumes you have multiple administrators and/or multiple clusters in your environment. Another servers dedicated for management can be introduced to help with management centralization or automating management.
Large Infrastructure assumes that you have more clusters spanning multiple racks or even sites. To help with bare-metal deployment, network management, patch management is SCVMM essential. Supporting roles (WSUS, WDS, Library servers) managed by SCVMM can be deployed across multiple servers. SCVMM supports deployment in HA Mode (Active-Passive) with SQL server Always On. DHCP is mandatory for bare-metal deployment as during PXE boot, server needs to obtain IP Address.
2.1.3 - 03. Planning Deployment Models and Workloads
Planning Deployment Models and Workloads
Depending on size, usage and complexity of the environment you need to design what deployment model for Azure Stack HCI you want to choose. HyperConvered deployment is the simplest. It’s great for it’s simplicity, however for specialized tasks (like CPU/RAM consuming Virtual Machines) with moderate/high storage workload it might be more effective to split CPU/RAM intensive workload and storage into Converged deployment.
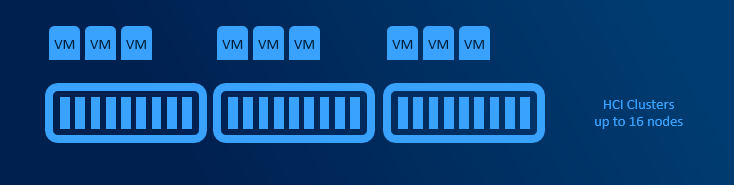
HyperConverged deployments
HyperConverged deployments can be small as 2 nodes connected directly with network cable and grow to multi-PB 16 node clusters (unlike traditional clusters, where limit is 64 nodes). Minimum requirements are described in hardware requirements doc.
Simplicity is the main benefit in this deployment model. All hardware is standardized and from one vendor, therefore there is a high chance that there are hundreds of customers with exact same configuration. This significantly helps with troubleshooting. There are no extra hops compared to SAN, where some IOs are going over FC infrastructure and some over LAN (CSV redirection).
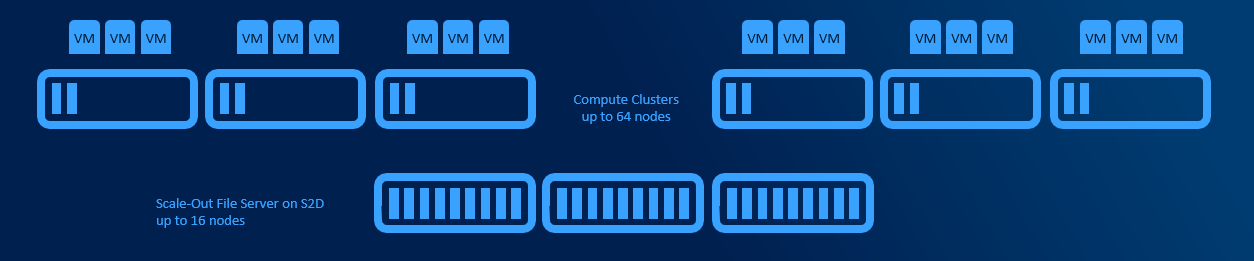
Converged deployments
Converged deployments have separate AzSHCI cluster with Scale-Out File Server role installed. Multiple compute clusters (up to 64 nodes each) can access single Scale-Out File Server. This design allows to use both Datacenter and Standard licenses for Compute Clusters.
This design adds some complexity as Virtual Machines are accessing its storage over network. Main benefit is, that one VM consuming all CPU cycles will not affect other VMs because of degraded storage performance and also you can scale storage independently from RAM and CPU (if you run out of cpu, no need to buy server loaded with storage). This design allows higher density, better deduplication job schedule and decreased east-west traffic (as VMs are pointed to it’s CSV owner node using Witness Service or new SMB Connections move on connect).
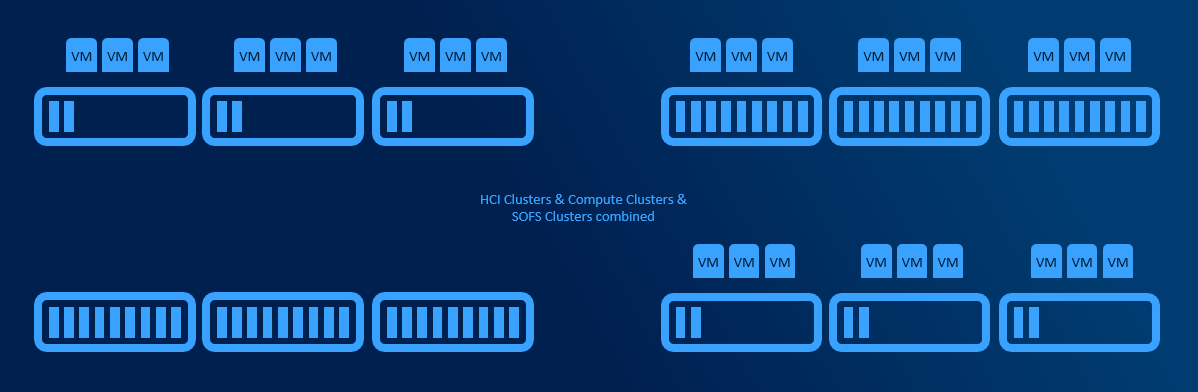
Cluster Sets
If multiple clusters are using multiple Scale-Out FileServers or even if multiple HyperConverged clusters are present, cluster sets helps putting all clusters under one namespace and allows to define fault domains. When VM is created, fault domain can be used (instead of pointing VM to specific node/cluster).
Technically all VMs are located on SOFS share that is presented using DFS-N namespace. This namespace is hosted on Management cluster that does not need any shared storage as all configuration data are in registry.
User Profile Disks host
Azure Stack HCI can also host user profile disks (UPDs). Since UPD is VHD (both native Windows Server functionality and FSLogix), Scale-Out File Server can be used as workload pattern is the same as for Virtual Machines. However it might make sense to use fileserver hosted Virtual Machine.
SQL
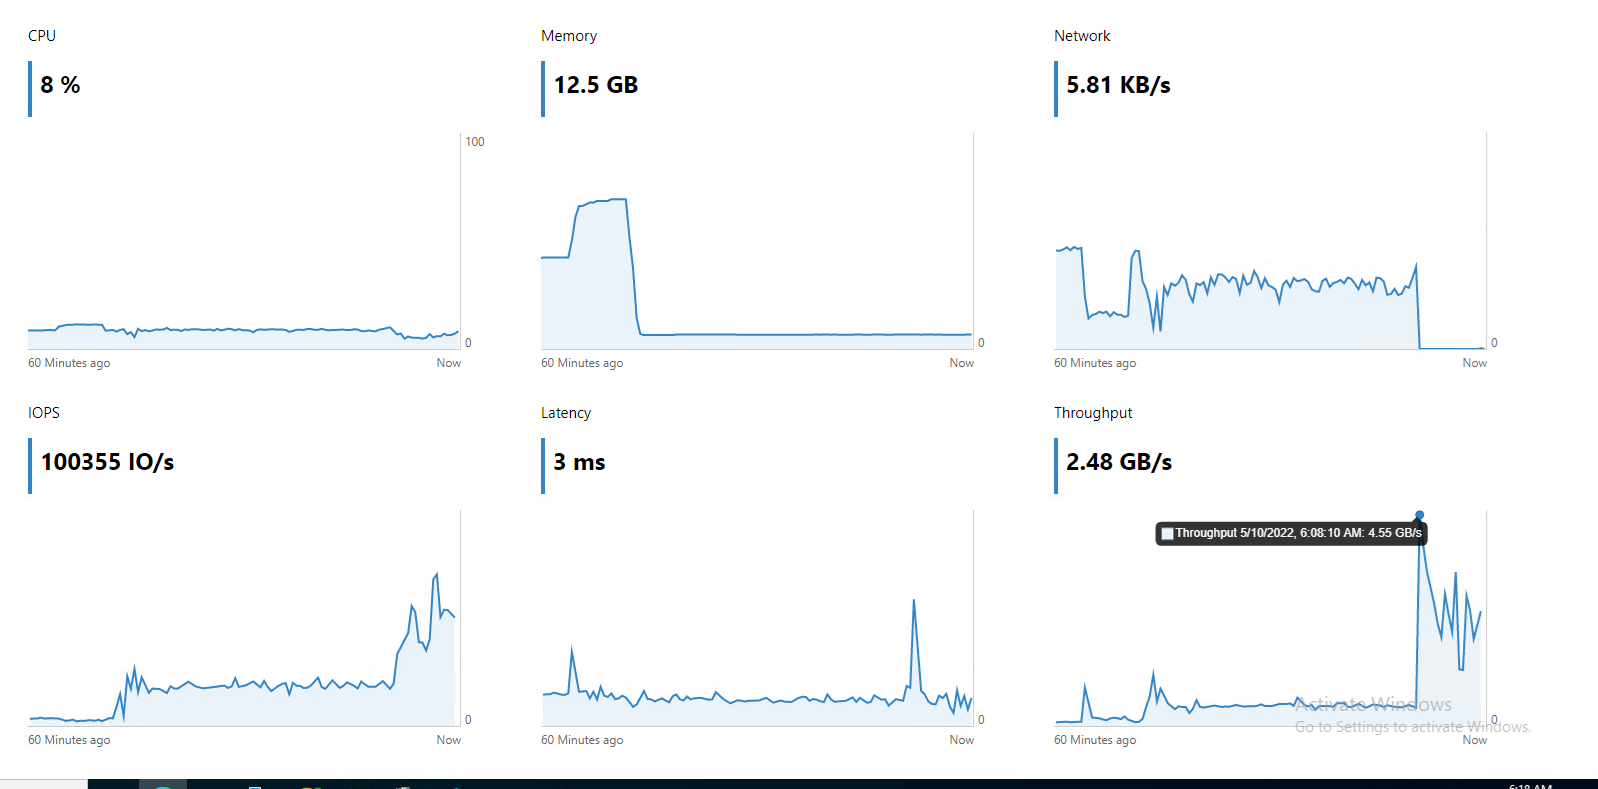
There are multiple ways to deploy SQL Server on Azure Stack HCI cluster. But in the end there are two main - Deploying a SQL Server in a Virtual Machine, or in AKS (Azure Kubernetes Service) as SQL Managed instance.
SQL Performance in one Virtual Machine (out of 40 on 4 node cluster) running SQL workload (database forced to read from disk)
Kubernetes
TBD
VDI
TBD
2.1.4 - 04. Planning Network Architecture
Planning Network Architecture
To correctly plan infrastructure design is key part in Azure Stack HCI planning. With incorrect configuration, the infrastructure might not be reliable under load. Depending on scale more complex solution might make sense to better control traffic.
In general there are two types of traffic - East-West and North-South. East-West is handled by SMB protocol (all traffic generated by Storage Bus Layer and Live Migration). North-South is mostly traffic generated by Virtual Machines.
Physicals switches should be configured with native VLAN for management traffic. This will significantly help as without configuring VLAN on physical host, you will be able to communicate over network. This helps bare metal deployment and also helps with Virtual Switch creation when management network is using vNIC.
In text above were several abbreviations used. Let’s explain few.
pSwitch = Physical Switch. It’s your Top of the rack Switch (TOR)
vSwitch = Virtual Switch. It is switch, that is created on host using New-VMSwitch command
vNIC = Virtual Network Adapter. It is a vNIC that is connected to Management OS (to parent partition). This is the NIC that is usually used for management or SMB.
vmNIC = Virtual Machine Network Adapter. This is a vNIC connected to Virtual Machine.
Topology design
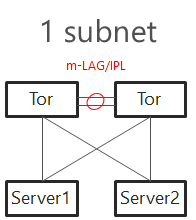
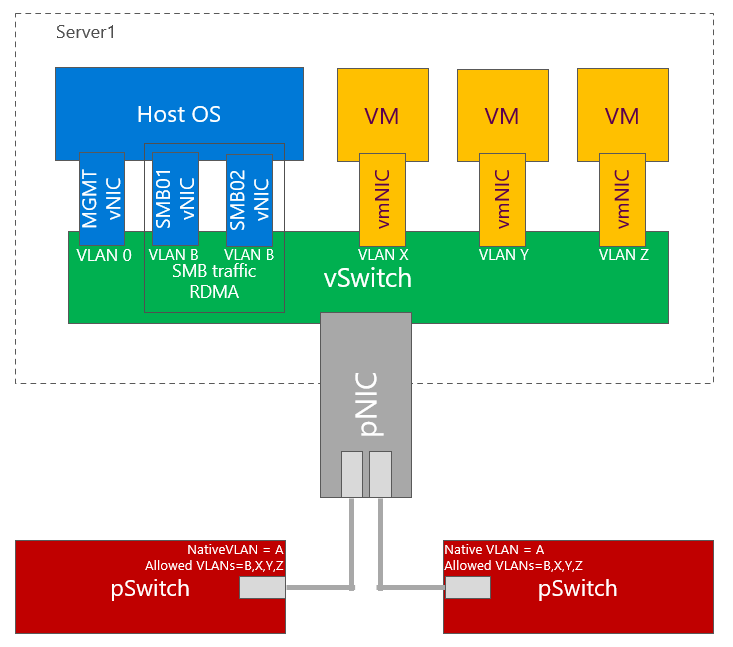
Single subnet
In Windows Server 2016 was support for single subnet multichannel in cluster support added. This allows to configure only single subnet for multiple network adapters dedicated for SMB Traffic. It is recommended topology design for smaller deployments, where interconnection between TOR switches can handle at least 50% network throughput generated by nodes (as there is 50% chance, that traffic travel using switch interconnect - m-LAG). For example with 4 nodes each node 2 times 25Gbps connections, you should have at least 100Gbps connection between TOR switches.
TOR Switches will be configured with Trunk and native (access) VLAN for management.
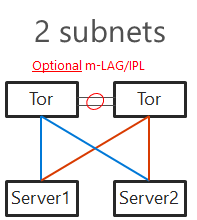
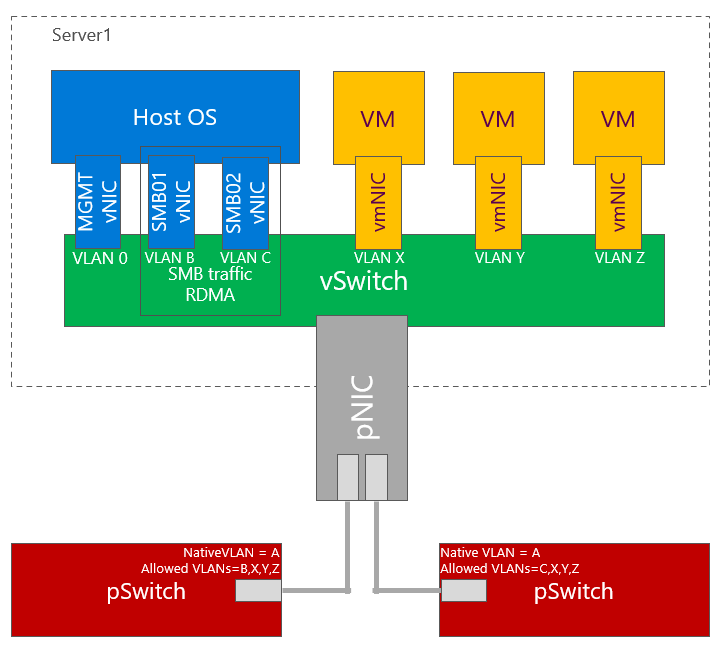
Two subnets
With increased number of nodes, there might be a congestion in TOR switches interconnect. Also in case congestion will happen and pause frame will be sent, both switches will be paused. To mitigate both, you can configure 2 subnets - each network switch will host separate subnet. This also brings one benefit - in converged setup if connection fails, it will be visible in failover cluster manager. m-LAG is optional if switches are dedicated for East-West (SMB) only. In this case as there is no traffic generated from SMB multichannel as each SMB adapter is in different subnet. In case VMs or any other traffic is using it, m-LAG is required.
TOR Switches will be configured with Trunk and native (access) VLAN for management with one slight difference from single subnet. Each subnet for SMB traffic will have it’s own VLAN. This will also help discover disconnected physical connections (https://youtu.be/JxKMSqnGwKw?t=204).
Note: Two subnet deployment is being now standard. Same approach is used when NetworkATC is deployed.
Direct connections (Switchless)
In Windows Server 2019 you can connect all nodes in mesh mode. In case you have 2 nodes, it’s just one connection. With 3 nodes, it’s 3 interconnects. With 5 nodes, it whoops to 10. For 2 or 3 nodes design it makes sense to use 2 connections between 2 nodes in case one link goes down (for example cable failure). This would result traffic going over slower connection (like 1Gb if North-South is using Gigabit network links). Dell supports up to 4 nodes in switchless configuration.
The math is simple. With 5 nodes its 4+3+2+1=10. Each connection requires separate subnet.
# Calculation for number of connections
$NumberOfNodes = 5
(1..($NumberOfNodes - 1) | Measure-Object -Sum).Sum
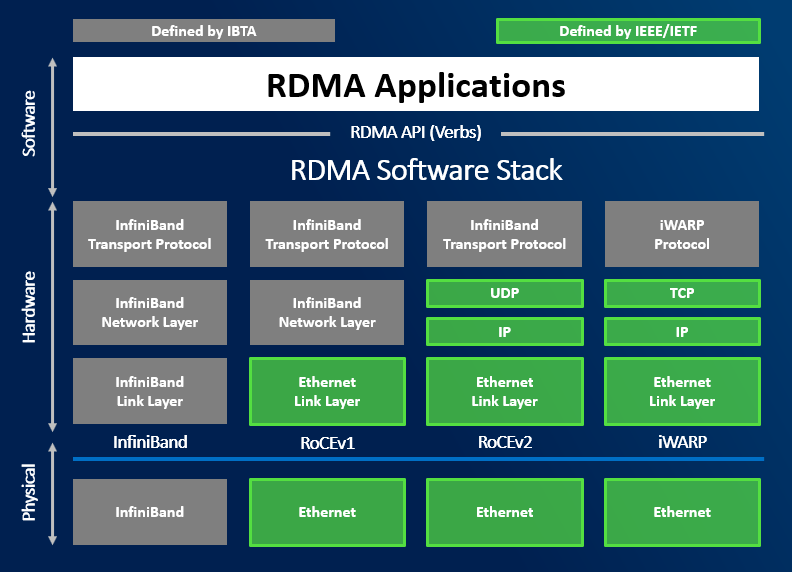
RDMA Protocols
RDMA is not required for Azure Stack HCI, but it is highly recommended. It has lower latency as traffic is using hardware data path (application can send data directly to hardware using DMA).
There are multiple flavors of RDMA. The most used in Azure Stack HCI are RoCEv2 and iWARP. Infiniband can be used also, but just for SMB traffic (NICs cannot be connected to vSwitch).
iWARP
iWARP is using TCP for transport. This is bit easier to configure as it uses TCP for Congestion Control. Configuring DCB/ETS is not mandatory. For larger deployments it is recommended as traffic can be prioritized.
Some network vendors require to configure Jumbo Frames to 9014.
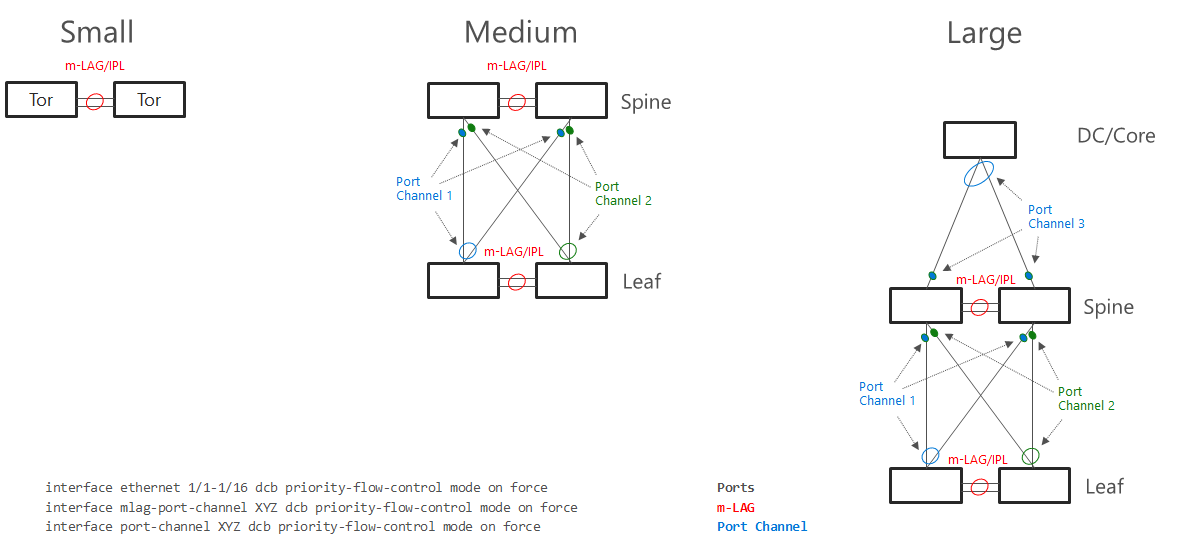
RoCE
RoCE is using UDP for transport. It is mandatory to enable DCB (PFC/ETS) and ECN on both physical NICs and physical network infrastructure.
If congestion control mechanisms are not correctly implemented, it can lead to huge retransmits. This can lead to infrastructure instabilities and storage disconnections. It is crucial to configure this correctly.
where DCB needs to be configured
Virtual Switch and Virtual Network adapters
Converged Design
This design is most common as it is simplest and requires just two ports. Since RDMA can be enabled on vNICs. In the example below is one VLAN used for SMB vNICs. As mentioned in above text, you may consider using two VLANs and two subnets for SMB vNICs to control traffic flow as it is becoming standard.
Converged design also makes best use of capacity (let’s say you have 4x25Gbps NICs), you can then use up to 100Gbps capacity for storage or Virtual Machines, while using latest technology such as VMMQ.
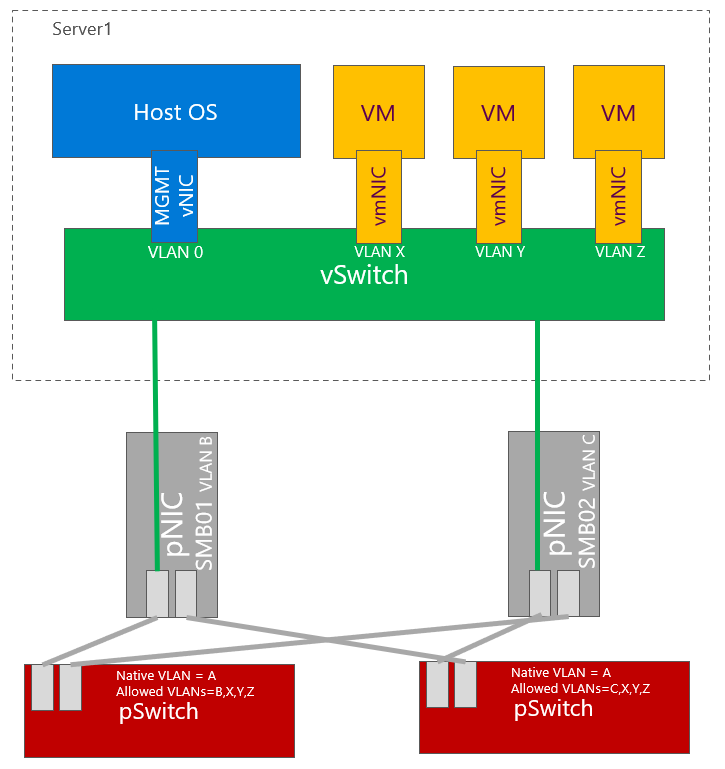
Dedicated NICs for East-West traffic
Some customers prefer to dedicate physical network adapters for east west traffic. In example below all physical ports on physical switch are configured the same (for simplicity). Also just two physical switches are used. You can also have dedicated switches for east-west traffic (for SMB). If DCB is configured, VLANs are mandatory for SMB adapters. In example below one VLAN for SMB is used. Two VLANs and two subnets can be used to better control traffic.
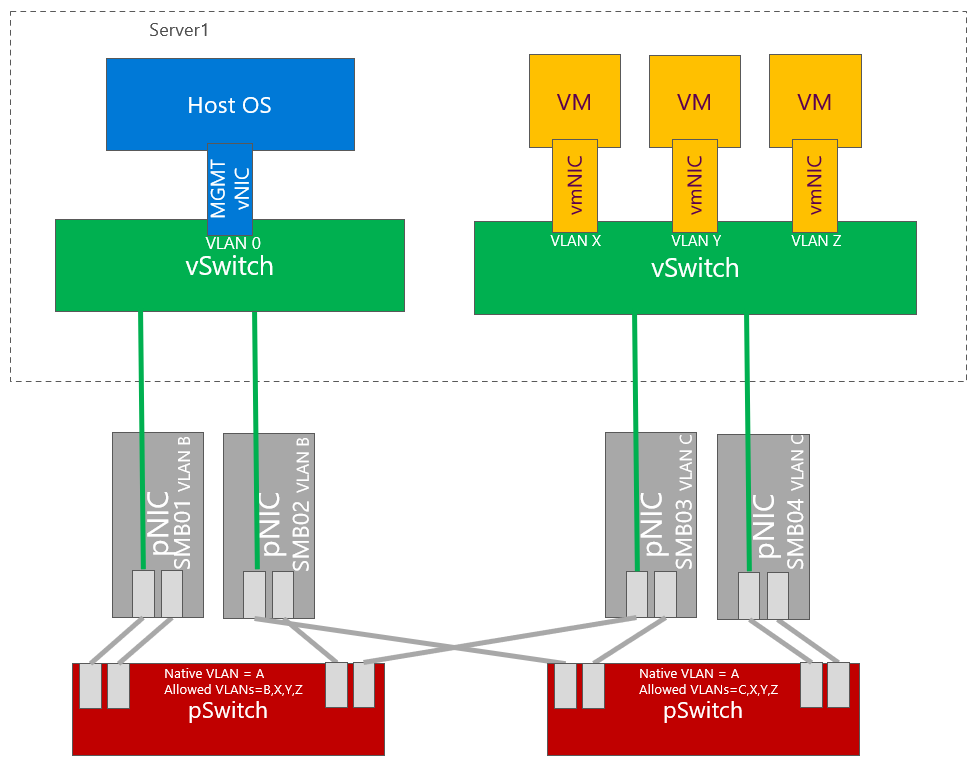
Dedicated NICs for East-West traffic and management
Some customers even prefer to have dedicated network cards (ports) for management. One of the reason can be customers requirements to have dedicated physical switches for management.
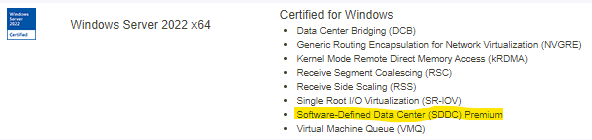
Network adapters hardware
Network adapters that support all modern features such as VMMQ or SDN offloading are in Hardware Compatibility list listed as Software-Defined Data Center (SDDC) Premium Additional Qualifier. For more information about Hardware Certification for Azure Stack HCI you can read this 2 part blog -
part1, part2.
2.1.5 - 05. Storage Capacity Planning
Planning capacity
Capacity reserve
When disk failure happens, it is necessary to have some capacity reserve to have immediate capacity to rebuild to. So for example if one disk in one node disconnects, there will be reserved capacity to have required number of copies (2 copies in 2-way mirror, 3 copies in 3-way mirror).
It is recommended to have largest disk capacity in each node not occupied - reserved. For calculation you can use http://aka.ms/s2dcalc. It is not necessary to mark disk as “reserved” or anything like that as it all about not consuming capacity of one disk.
Since we regular maintenance is required (security patches), reboot might be necessary. Or for example if any hardware upgrade is done (for example increasing RAM), node might need to be put into maintenance mode or even shut down. If VMs are required to run, then there has to be capacity (RAM) to keep VMs running on rest of the nodes.
With more than 5 nodes it might make sense to reserve entire node. You will have capacity for VMs when node in maintenance, and you will be also able to rebuild if one node is completely lost - assuming all disks damaged (which is usually unlikely to happen as usually just one component fails and can be replaced withing service agreement).
Resiliency options
Mirror (two-way and three-way)
Two-way mirroring writes two copies of everything. Its storage efficiency is 50% - to write 1TB of data, you need at least 2TB of physical storage capacity. Likewise, you need at least two fault domains. By default, fault domain is Storage Scale Unit (which translates into server node). Fault domain can be also Chassis or Rack. Therefore if you have two node cluster, two-way mirroring will be used.
With three-way mirror, the storage efficiency is 33.3% - to write 1TB of data, you need at least 3TB of physical storage capacity. Likewise you need to have at least three fault domains. If you have 3 nodes, by default three-way mirror will be used.
Dual-parity
Dual parity implements Reed-Solomon error-correcting codes to keep two bitwise parity symbols, thereby providing the same fault tolerance as three-way mirroring (i.e. up to two failures at once), but with better storage efficiency. It most closely resembles RAID-6.
To use dual parity, you need at least four hardware fault domains – with Storage Spaces Direct, that means four servers. At that scale, the storage efficiency is 50% – to store 2 TB of data, you need 4 TB of physical storage capacity.
With increasing number of fault domains (nodes), local reconstruction codes, or LRC can be used. LRC can decrease rebuild times as only local (local group) parity can be used to rebuild data (there is one local and one global parity in dataset).
Mirror-Accelerated Parity
Spaces Direct volume can be part mirror and part parity. Writes land first in the mirrored portion and are gradually moved into the parity portion later. Effectively, this is using mirroring to accelerate erasure coding.
To mix three-way mirror and dual parity, you need at least four fault domains, meaning four servers.
The storage efficiency of mirror-accelerated parity is in between what you’d get from using all mirror or all parity, and depends on the proportions you choose
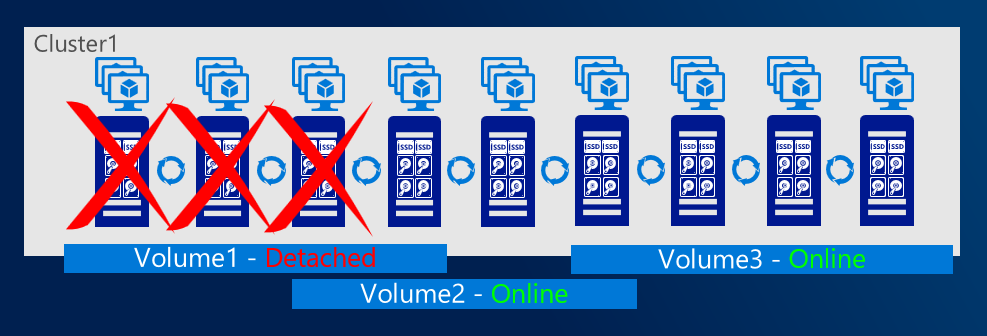
With increasing number of nodes it might be useful to put data only on selected nodes to better control what data will be accessible in case of failure of certain nodes. With scoped volumes, volumes can system tolerate more than 2 nodes failure while keeping volumes online.
Cache drives
Faster media can be used as cache. If HDDs are used, cache devices are mandatory. Cache drives do not contribute to capacity.
In hyperconverged systems, CPU handles both VMs and Storage. Rule of thumb is that each logical processor can handle ~60MiB IOPS. Let’s calculate an exaple: four node cluster, each node two twelve-core CPUs results. If we consider 4k IOPS, each LP can handle ~15k IOPS. With 4 nodes, 24 LPs each it results in ~1.5M IOPS. All assuming that CPU is used for IO operations only.
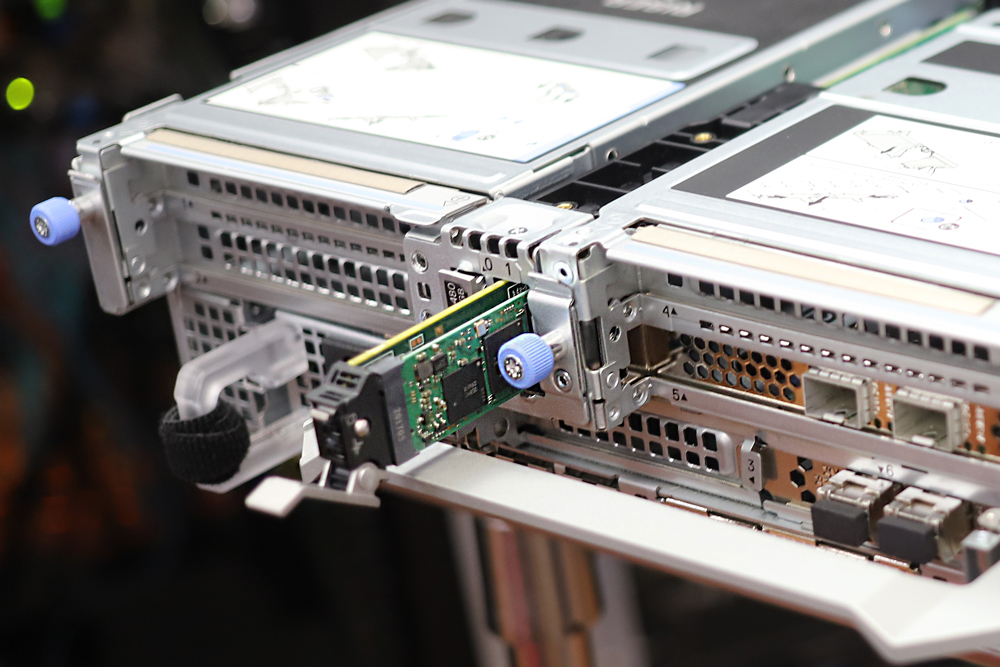
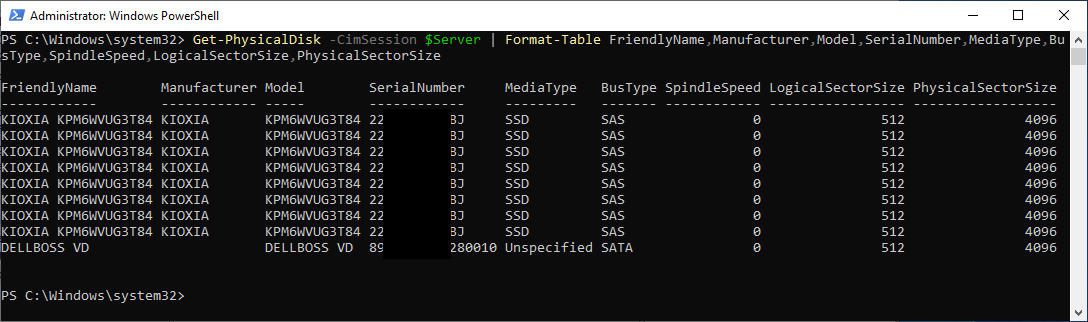
Storage devices
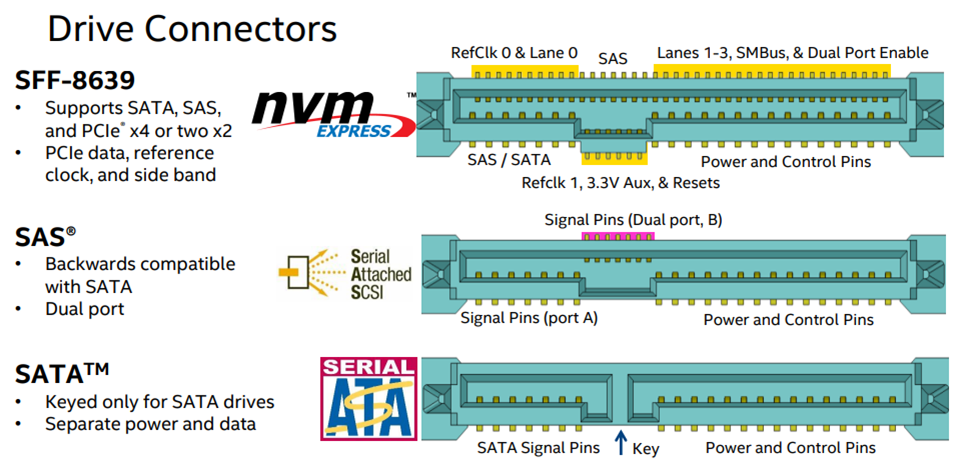
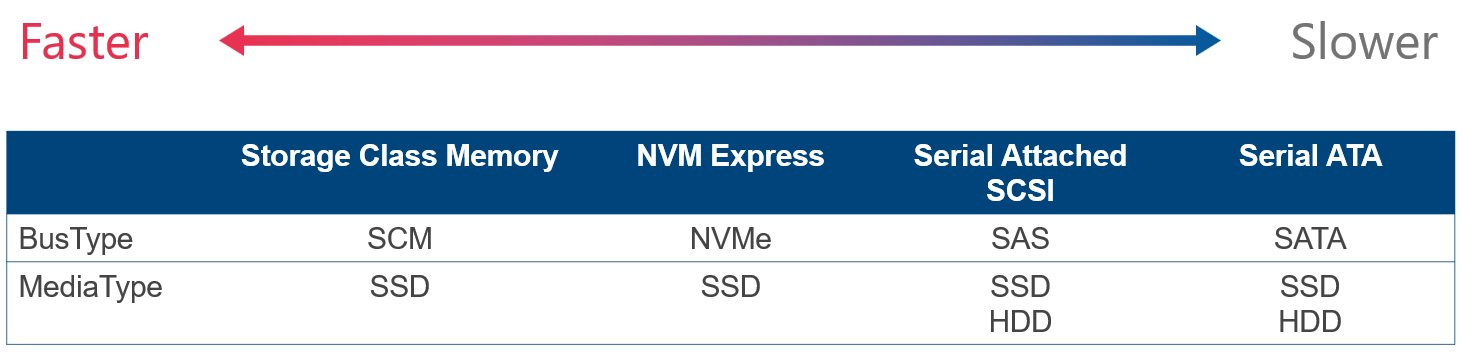
In general, there are two kinds of devices - spinning media and solid state media disks. We all know this story as it’s been some time we upgraded our PCs with SSDs and we were able to see the significant latency drop. There are two factors though - type of media (HDD or SSD) and type of bus (SATA, SAS, NVMe or Storage Class Memory -SCM).
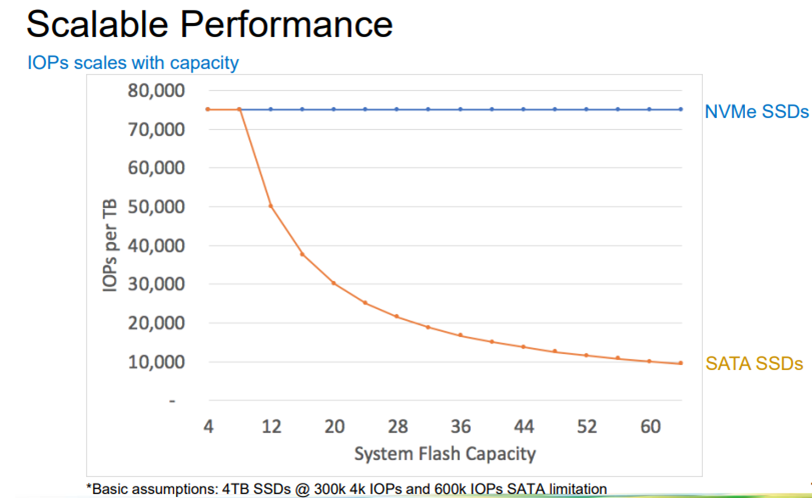
HDD mediatype is always using SATA or SAS. And this type of bus was more than enough for it’s purpose. With introduction of SSD mediatype, SATA/SAS started to show it’s limitation. Namely with SATA/SAS you will utilize 100% of your CPU and you will not be able to reach more than ~300k IOPS. It’s because SATA/SAS was designed for spinning media and also one controller connects multiple devices to one PCIe connection. NVMe was designed from scratch for low latency and parallelism and has dedicated connection to PCIe. Therefore NAND NVMe outperforms NAND SATA/SAS SSD drive.
Another significant leap was introduction of Intel Optane SSD, that introduces even lower latencies than NAND SSDs. And since in Optane media is bit addressable, there is no garbage to collect (on NAND SSD you erase only in blocks with negative performance impact).
Important piece when selecting storage devices is, that if you consider SSD+HDD combination, all heavy lifting will end up in one SATA/SAS controller connected into one PCIe slot. Therefore it’s recommended to consider using NVMe instead, as each NVMe will have its PCIe line.
Network cards
There are several considerations when talking about network cards.
Network Interface Speed
Network Cards are coming in speeds ranging from 1Gbps to 200Gbps. While hyperconverged infrastructure will work with 1Gbps, the performance will be limited. The requirement is to have at least one 10Gbps port per server. However it’s recommended to have at least 2x10Gbps with RDMA enabled.
Mediatype
Recommended NICs
SSD as cache or SSD all-flash
2×10 Gbps or 2x25Gbps
NVMe as cache
2-4×25Gbps or 2×100Gbps
NVMe all-flash
2-4×25Gbps or 2×100Gbps
Optane as cache
2-4×100 Gbps or 2×200Gbps
Use of RDMA
When RDMA is enabled, it will bypass networking stack and DMA directly into memory of NIC. This will significantly reduce CPU overhead. While RDMA is not mandatory, it’s highly recommended for Azure Stack HCI as it will leave more CPU for Virtual Machines and Storage.
RDMA protocol
There are two flavors of RDMA. iWARP (TCP/IP) and RoCE (UDP). The main difference a need of lossless infrastructure for RoCE as when switch is loaded and starts dropping packets, it cannot prioritize or even notify infrastructure to stop sending packets if DCB/PFC/ETS is not configured. When packet is dropped on UDP, large retransmit needs to happen and this cause even higher load on switches. Retransmit will also happen on TCP/IP, but significantly smaller. It is still recommended to configure PFC/ETS on both if possible - in case switch needs to notify infrastructure to stop sending packets.
Network infrastructure
Reliable, low latency infrastructure is a must for reliable function of Converged and HyperConverged infrastructure. As already covered above, DCB (PFC nad ETS) is recommended for iWARP and required for RoCE. There is also alternative - starting Windows Server 2019, direct connection is supported. As you can see, it does not make sense to have more than 5 nodes in the cluster (with increasing number of interconnects)
Number of nodes
Number of direct connections
2
1
3
3
4
6
5
10
Note: Dell supports up to 4 nodes in switchless configuration
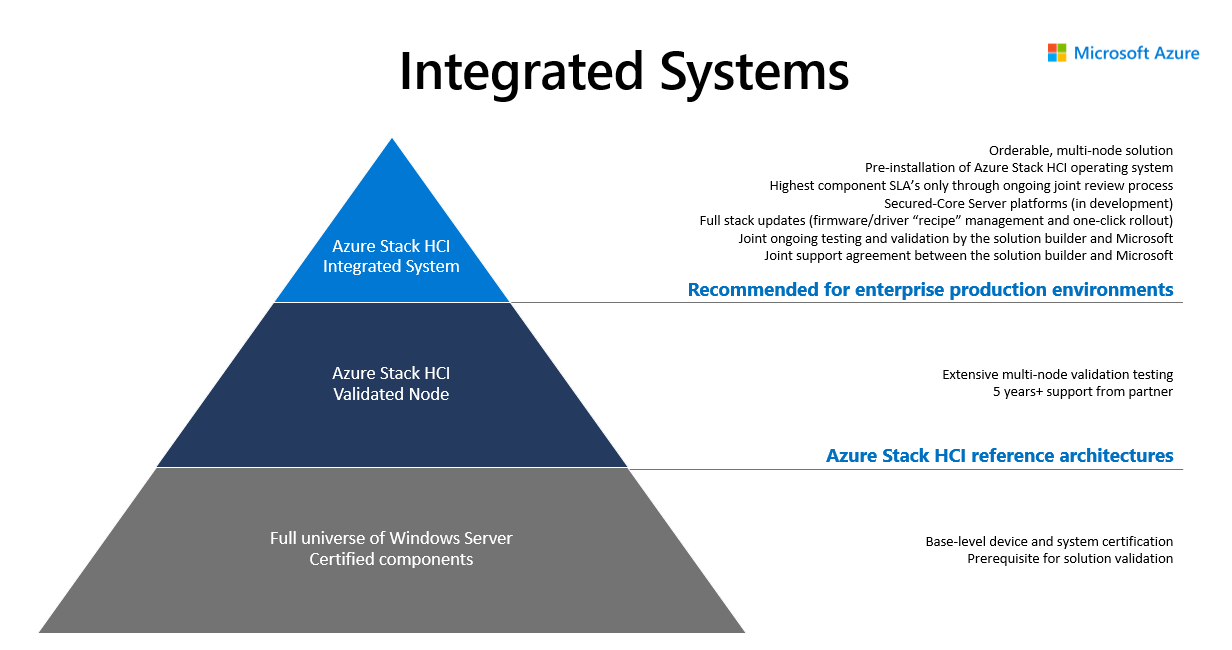
Hardware certification programme
It is very important to follow validated hardware path. This way you can avoid ghost hunting when single component will misbehave due to firmware or even hardware not being able to handle load under high pressure. There is very good blog summarizing importance of validated hardware part1part2. Validated solutions are available in Azure Stack HCI Catalog. For Azure Stack HCI you can also consider Integrated System which includes the Azure Stack HCI operating system pre-installed as well as partner extensions for driver and firmware updates.
Note: Dell sells only Integrated Systems as Microsoft highly recommend those over just verified solutions.
2.2 - Storage Stack
2.2.1 - Storage Stack Overview
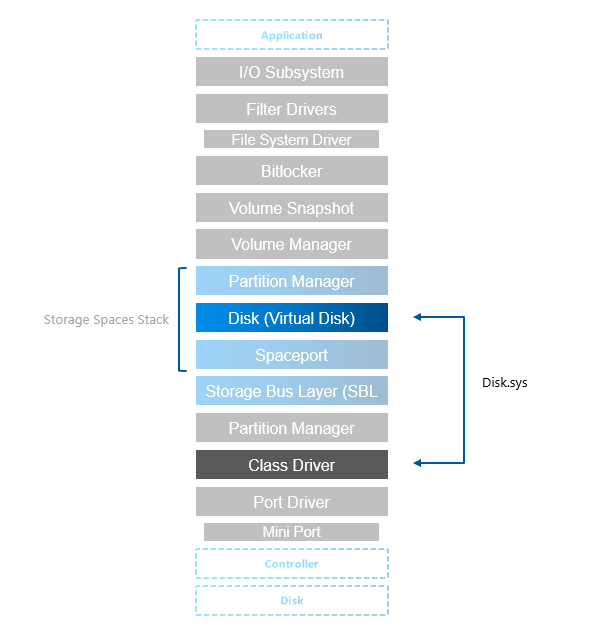
Understanding storage stack is crucial for understanding what technologies are involved and how (where storage replica is, where is ReFS Multi-resilient Volume, …). Understanding how layers are stacked will also help when IO flow is troubleshooted - like reviewing performance counters or troubleshooting core functionality.
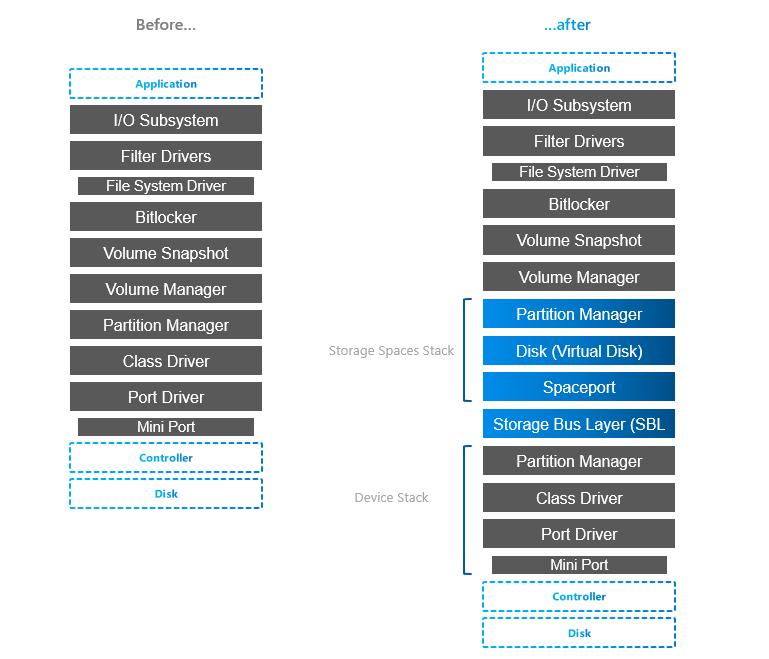
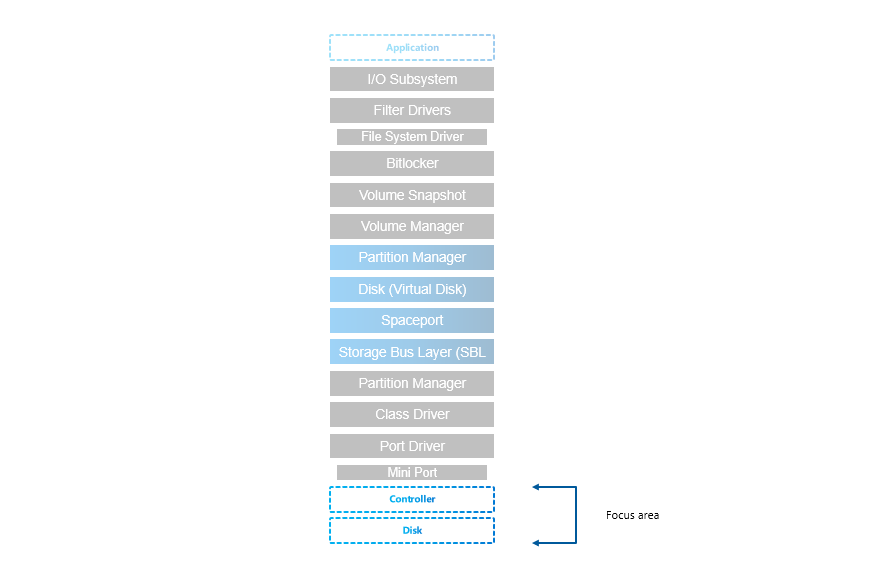
Traditional stack compared to storage spaces stack (note that MPIO is missing, but for Storage Spaces Direct it’s not needed as there is only one path to the physical device, so it was omitted)
You can notice 4 “new” layers, but actually it’s just Spaces layer (Spaceport) and Storage Bus Layer.
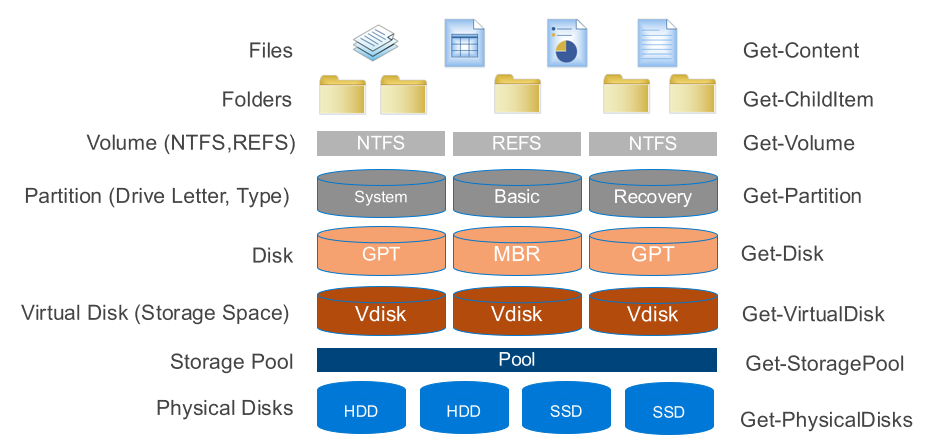
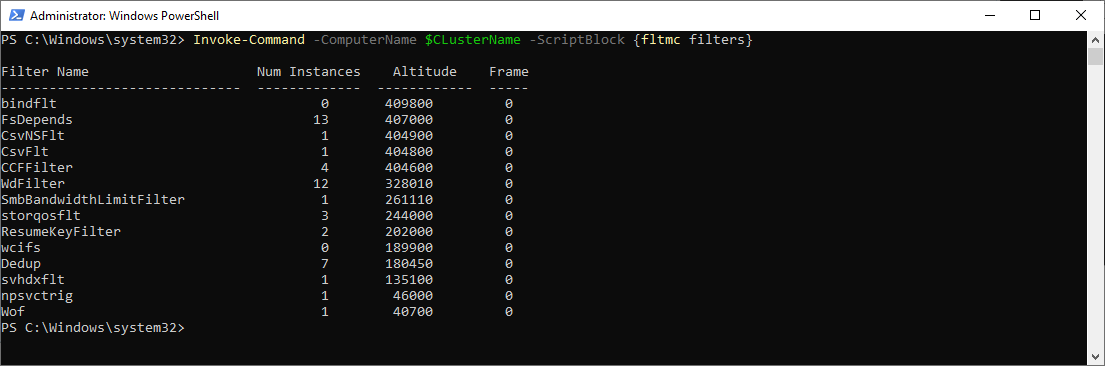
To better understand what’s in the stack, you can also explore some parts with PowerShell
Anyway, let’s explore layers a bit. Following info is based on storage description someone somewhere created and pushed to internet. The only version found was from webarchive and can be accessed here.
Layers below S2D Stack
Port & Miniport driver
storport.sys & stornvme.sys
Port drivers implement the processing of an I/O request specific to a type of I/O port, such as SATA, and are implemented as kernel-mode libraries of functions rather than actual device drivers. Port driver is written by Microsoft (storport.sys). If third party wants to use write their own device driver (like HBA), then it will use miniport driver (except if device is NVMe, then miniport driver is Microsoft stornvme.sys)
Miniport drivers usually use storport. performance enhancements such as support for the paralell execution of IO.
A storage class driver (typically disk.sys) uses the well-established SCSI class/port interface to control a mass storage device of its type on any bus for which the system supplies a storage port driver (currently SCSI, IDE, USB and IEEE 1394). The particular bus to which a storage device is connected is transparent to the storage class driver.
Storage class driver is responsible for claiming devices, interpreting system I/O requests and many more
In Storage Spaces stack (Virtual Disk) disk.sys is responsible for claiming Virtual Disk exposed by spaceport (storage spaces)
Partition Manager
partmgr.sys
Partitions are handled by partmgr.sys. Partition is usually GPT or MBR (preferably GPT as MBR has many limitations such as 2TB size limit)
As you can see in the stack, there are two partition managers. One partition layout is on physical disk and it is then consumed by storage spaces (spaceport).
On the picture below you can see individual physical disk from spaces exposed and it’s partitions showing metadata partition and partition containing pool data (normally not visible as it’s hidden by partmgr.sys when it detects spaces).
S2D Stack
Storage Bus Layer
clusport.sys and clusblft.sys
These two drivers (client/server) are exposing all physical disk to each cluster node, so it looks like all physical disks from every cluster node are connected to each server. For interconnect is SMB used, therefore high-speed RDMA can be used (recommended).
It also contains SBL cache.
Spaceport
spaceport.sys
Claims disks and adds them to storage spaces pool. It creates partitions where internal data structures are metadata are kept (see screenshot in partition manager).
Defines resiliency when volume (virtual disk) is created (creates/distributes extents across physical disks)
Virtual Disk
disk.sys is now used by storage spaces and exposes virtual disk that was provisioned using spaceport.sys
Layers above S2D Stack
Volume Manager
dmio.sys, volmgr.sys
Volumes are created on top of the partition and on volumes you can then create filesystems and expose it to the components higher in the stack.
Volume Snapshot
volsnap.sys
Volsnap is the component that creates system provider for the volume shadow copy service (VSS). This service is controller by vssadmin.exe
BitLocker
fvevol.sys
BitLocker is well known disk encryption software that is on the market since Windows Vista. In PowerShell you can expose volume status with Get-BitLockerVolume command.
Filter Drivers
Interesting about filter drivers is, that all FileSystem drivers are actually filter drivers - special ones, File System Drivers - like REFS.sys, NTFS.sys, Exfat.sys.
You can learn more about filesystem using fsutil
There are also many first party and third party filter drivers. You can expose those with fltmc command
As you can see on above example, there are many filters like Cluster Shared Volume (CsvNSFlt, CsvFLT), deduplication (Dedup), shared vhd (svhdxflt), storage QoS (storqosflt) and many more. Each filter driver has defined altitude and 3rd parties can reserve theirs.
While SATA is still well performing for most of the customers (see performance results), NVMe offers benefit of higher capacity and also more effective protocol (AHCI vs NVMe), that was developed specifically for SSDs (opposite to AHCI, that was developed for spinning media). SATA/SAS is however not scaling well with the larger disks.
There is also another aspect of performance limitation of SATA/SAS devices - the controller. All SATA/SAS devices are connected to one SAS controller (non-raid) that has limited speed (only one PCI-e connection).
Drive Connector is universal (U2, also known as SFF-8639)
NVMe backplane connection - Example AX7525 - 16 PCIe Gen4 lanes in each connection (8 are used), 12 connections in backplane, in this case no PCIe switches.
SSDs were originally created to replace conventional rotating media. As such they were designed to connect to the same bus types as HDDs, both SATA and SAS (Serial ATA and Serial Attached SCSI).
However, this imposed speed limitations on the SSDs. Now a new type of SSD exists that attaches to PCI-e. Known as NVMe SSDs or simply NVMe.
When combining multiple media types, faster media will be used as caching. While it is recommended to use 10% of the capacity for cache, it should be noted, that it is just important to not spill the cache with the production workload, as it will dramatically reduce performance. Therefore all production workload should fit into the Storage Bus Layer Cache (cache devices). The sweet spot (price vs performance) is combination of fast NVMe (mixed use or write intensive) with HDDs. For performance intensive workloads it’s recommended to use all-flash solutions as caching introduces ~20% overhead + less predicable behavior (data can be already destaged…), therefore it is recommended to use All-Flash for SQL workloads.
In Dell Servers are BOSS (Boot Optimized Storage Solution) cards used. In essence it card wih 2x m2 2280 NVMe disks connected to PCI-e with configurable non-RAID/RAID 1
Consumer-Grade SSDs
You should avoid any consumer grade SSDs as consumer grade SSDs might contain NAND with higher latency (therefore there can be performance drop after spilling FTL buffer) or because consumer grade SSDs are not power protected (PLP). You can learn more about why consumer-grade SSDs are not good idea in a blog post. Consumer-grade SSDs do also have lower DWPD (Disk Written Per Day). You can learn about DWPD in this blogpost
From screenshot you can see, that AX640 BOSS card reports as SATA device with Unspecified Mediatype, while SAS disks are reported as SSDs, with SAS BusType. Let’s deep dive into BusType/MediaType a little bit (see table below)
Storage Spaces requires BusType SATA/SAS/NVMe or SCM. BusType RAID is unsupported.
You can also see Logical Sector Size and Physical Sector size. This refers to Drive Type (4K native vs 512E vs 512).
Once disk is added to storage spaces, S.M.A.R.T. attributes can be filtered out. For reading disk status (such as wear level temperatures…) can be get-storagereliability counter used.
Dell Technologies does not currently support upgrading Azure Local instances to Azure Stack HCI OS 24H2 or deploying Azure Local instances with Azure Stack HCI OS 24H2. Support for these scenarios is coming soon. Azure Local instances running Solution 2504 and newer are supported only with Azure Stack HCI OS 23H2.
NOTE
Azure Stack HCI version 22H2 will reach end of support on May 31st, 2025. After this date, you will not receive monthly security and quality updates from Microsoft. Microsoft recommends that customers upgrade their operating system to 23H2 to continue receiving updates.
Dell Technologies has been unable to validate this OS upgrade on stretched clusters because we have encountered a production-impacting bug in the upgrade that can cause corruption of metadata. Due to the nature of the bug, Dell Technologies recommends customers wait until a fix is available from Microsoft before attempting this upgrade.
Customers who choose to upgrade the OS of their stretched clusters before a fix is available from Microsoft can contact Microsoft for support with the upgrade.
2.3.1 - Azure Local Support Matrix (2503)
2.3.1.1 - Azure Local Support Matrix for 14G-15G (2503)
NOTE
The Dell AX System for Azure Local AX-640, AX-740xd, AX-650, AX-750, AX-7525, and AX-6515 now supports upgrades from Azure Stack HCI operating system 22H2 to Azure Stack HCI operating system 23H2. The cluster must have firmware and drivers updated to the levels listed in this support matrix prior to starting the upgrade process.
Windows Server 2022 Datacenter Windows Server 2025 Datacenter Azure Stack HCI-22H2 Azure Stack HCI-23H2
AX-4520c
Windows Server 2022 Datacenter Windows Server 2025 Datacenter Azure Stack HCI-22H2 Azure Stack HCI-23H3
AX-640
Windows Server 2019 Datacenter Windows Server 2022 Datacenter Azure Stack HCI-22H2 Azure Stack HCI-23H2 (Upgrade from Azure Stack HCI-22H2 only)
AX-740xd
Windows Server 2019 Datacenter Windows Server 2022 Datacenter Azure Stack HCI-22H2 Azure Stack HCI-23H2 (Upgrade from Azure Stack HCI-22H2 only)
AX-6515
Windows Server 2019 Datacenter Windows Server 2022 Datacenter Windows Server 2025 Datacenter Azure Stack HCI-22H2 Azure Stack HCI-23H2 (Upgrade from Azure Stack HCI-22H2 only)
AX-7525
Windows Server 2019 Datacenter Windows Server 2022 Datacenter Windows Server 2025 Datacenter Azure Stack HCI-22H2 Azure Stack HCI-23H2
AX-650
Windows Server 2022 Datacenter Windows Server 2025 Datacenter Azure Stack HCI-22H2 Azure Stack HCI-23H2
AX-750
Windows Server 2022 Datacenter Windows Server 2025 Datacenter Azure Stack HCI-22H2 Azure Stack HCI-23H2
The Dell Technologies provided operating system golden image for Azure Local instances is for imaging AX servers prior to deploying an Azure Local instance. This image is based on the Azure Stack HCI OS, with Microsoft customization and Dell Technologies customization. This image includes drivers provided by Dell Technologies.
Azure Local Golden Images for Solution version 10.*
Use with Azure Local instances running Solution version 11.*.1001.*
Specify Azure Local instance Solution version when running Arc registration using: Invoke-AzStackHciArcInitialization -TargetSolutionVersion [Solution Version]
2.3.2.1 - Azure Local Support Matrix for 14G-15G (2412)
NOTE
The Dell AX System for Azure Local AX-640, AX-740xd, AX-650, AX-750, AX-7525, and AX-6515 now supports upgrades from Azure Stack HCI operating system 22H2 to Azure Stack HCI operating system 23H2. The cluster must have firmware and drivers updated to the levels listed in this support matrix prior to starting the upgrade process.
2.3.3 - Dell Solution Builder Extensions for Azure Local Integrated System AX Server Release Notes
2.3.4 - Azure Stack HCI Support Matrix (Archive)
2.3.4.1 - Azure Stack HCI Firmware and Driver Matrix for Legacy Windows Server Operating Systems (Windows Server 2016)
Introduction
This matrix is for Windows Server operating systems that have exited Microsoft mainstream support. This Windows Server operating system is no longer being validated by Dell for use with hyperconverged cluster deployments. The table in the below link is a snapshot of the last firmware and driver versions that were validated by Dell engineering for use with this legacy Windows Server version.
Customers that are still running this Windows Server version for their hyperconverged cluster deployments are encouraged to perform an in-place upgrade to the Windows Server 2022 operating system per instructions at the following link.
Azure Stack Docs is an open-source project and we thrive to build a welcoming and open community for anyone who wants to use the project or contribute to it.
Contributing to Azure Stack Docs
Become one of the contributors to this project!
You can contribute to this project in several ways. Here are some examples:
Test your changes locally and make sure it is not breaking anything.
Code reviews
All submissions, including submissions by project members, require review.
We use GitHub pull requests for this purpose.
Branching strategy
The Azure Stack documentation portal follows a release branch strategy where a branch is created for each release and all documentation changes made for a release are done on that branch. The release branch is then merged into the main branch at the time of the release. In some situations it may be sufficient to merge a non-release branch to main if it fixes some issue in the documentation for the current released version.
By default, local changes will be reflected at http://localhost:1313/. Hugo will watch for changes to the content and automatically refreshes the site.
Note: To bind it to different server address use hugo server --bind 0.0.0.0, default is 127.0.0.1
After testing the changes locally, raise a pull request after editing the pages and pushing it to GitHub.
Hardcoded relative links like [troubleshooting observability](../../observability/troubleshooting.md) will behave unexpectedly compared to how they would work on our local file system.
To avoid broken links in the portal, use regular relative URLs in links that will be left unchanged by Hugo.
Style guide
Use sentence case wherever applicable.
Use the numbered lists for items in sequential order and bulletins for the other lists.